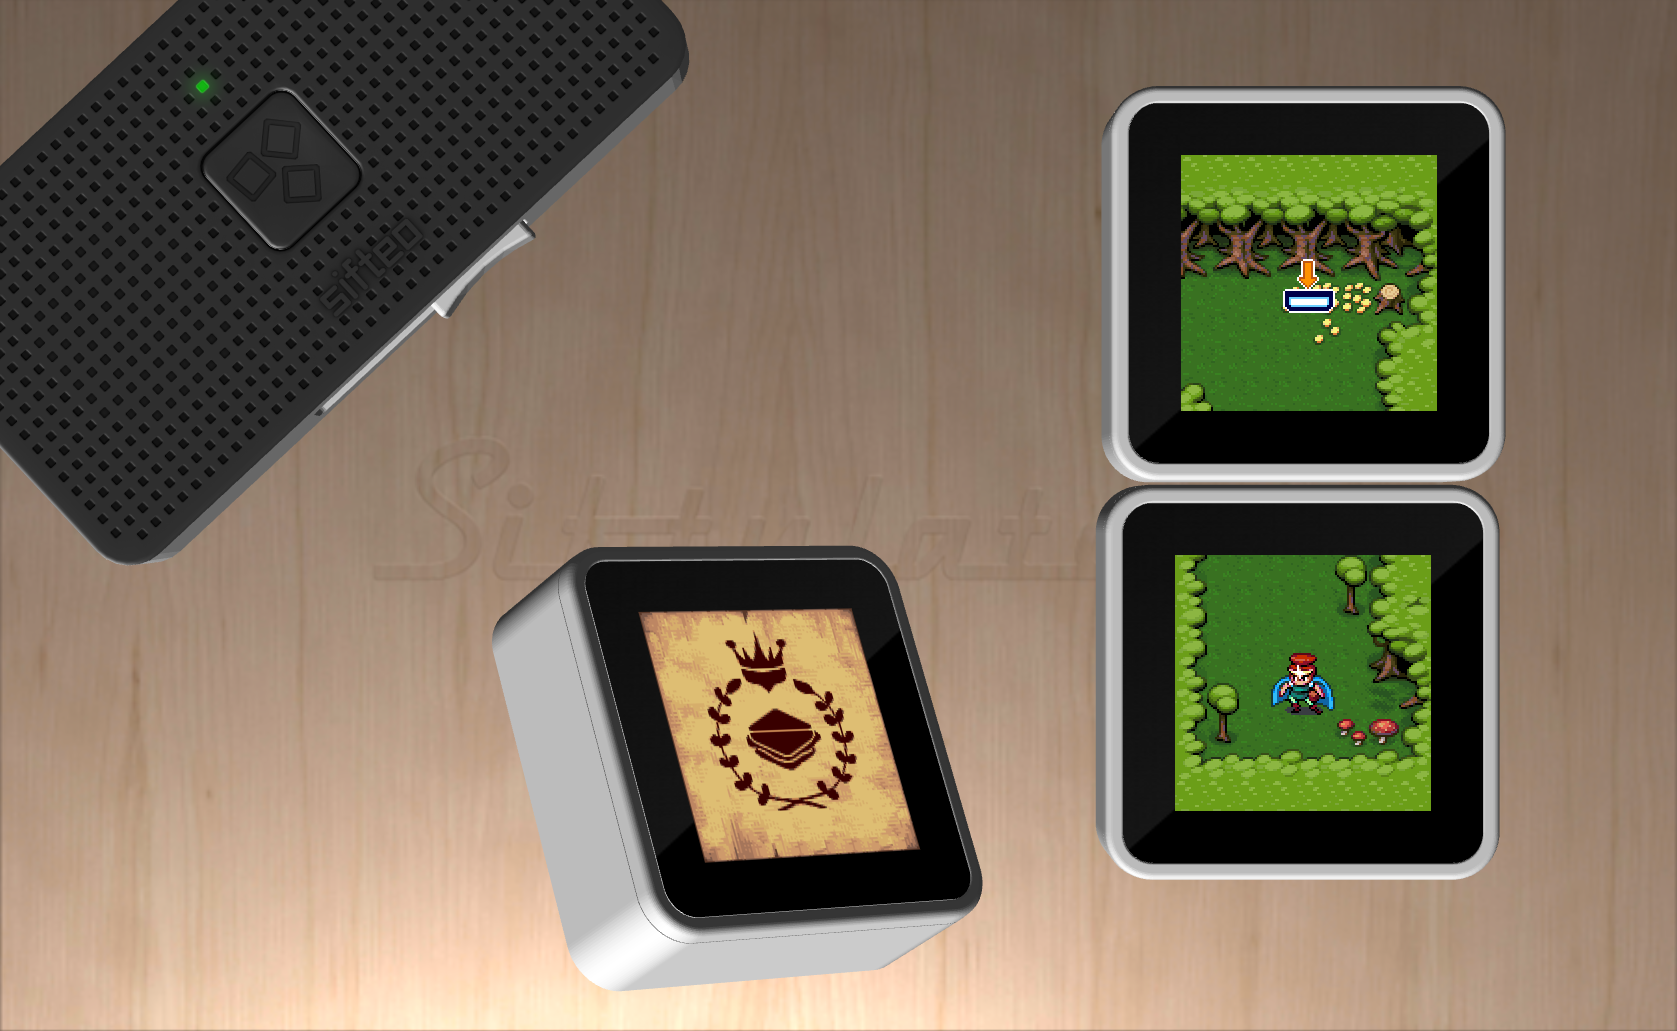
How we built a Super Nintendo out of a wireless keyboard

I wrote a guest article for Adafruit about the story behind the new Sifteo cubes:

In today’s world, video game consoles have become increasingly complex virtual worlds unto themselves. Shiny, high polygon count, immersive, but ultimately indirect. A video game controller is your gateway to the game’s world—but the gateway itself can be a constant reminder that you’re outside that world, looking in.

Likewise, the technology in these game consoles has become increasingly opaque. Decades ago, platforms like the Commodore 64 encouraged tinkerers and do-it-yourselfers of all kinds. You could buy commercial games, sure, but the manual that shipped with the C-64 also told you what you needed to know to make your own games, tools, or even robots. The manual included a full schematic, the components were in large through-hole packages, and most of them were commonly-available chips with published data sheets.

Fast forward three decades. Today’s video game consoles are as powerful and as complex as a personal computer, with elaborate security systems designed specifically to keep do-it-yourselfers out. They contain dozens of customized or special-purpose parts, and it takes some serious wizardry to do anything with them other than exactly what the manufacturer intended. These systems are discouragingly complicated. It’s so hard to see any common link between the circuits you can build at home, and the complex electrical engineering that goes into an Xbox 360 or Playstation 3.

We wanted to build something different. Our platform has no controller, no television. The system itself is the game world. To make this happen, we had to take our engineering back to basics too. This is a game platform built using parts that aren’t fundamentally different from the Arduino or Maple boards that tens of thousands of makers are using right now.

This is the story of how we built the hardware behind the new Sifteo Cubes, our second generation of a gaming platform that’s all about tactile sensation and real, physical objects.

Read the full article at Adafruit.

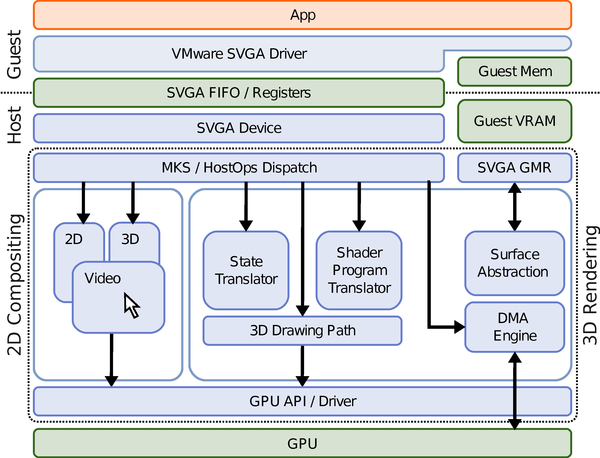
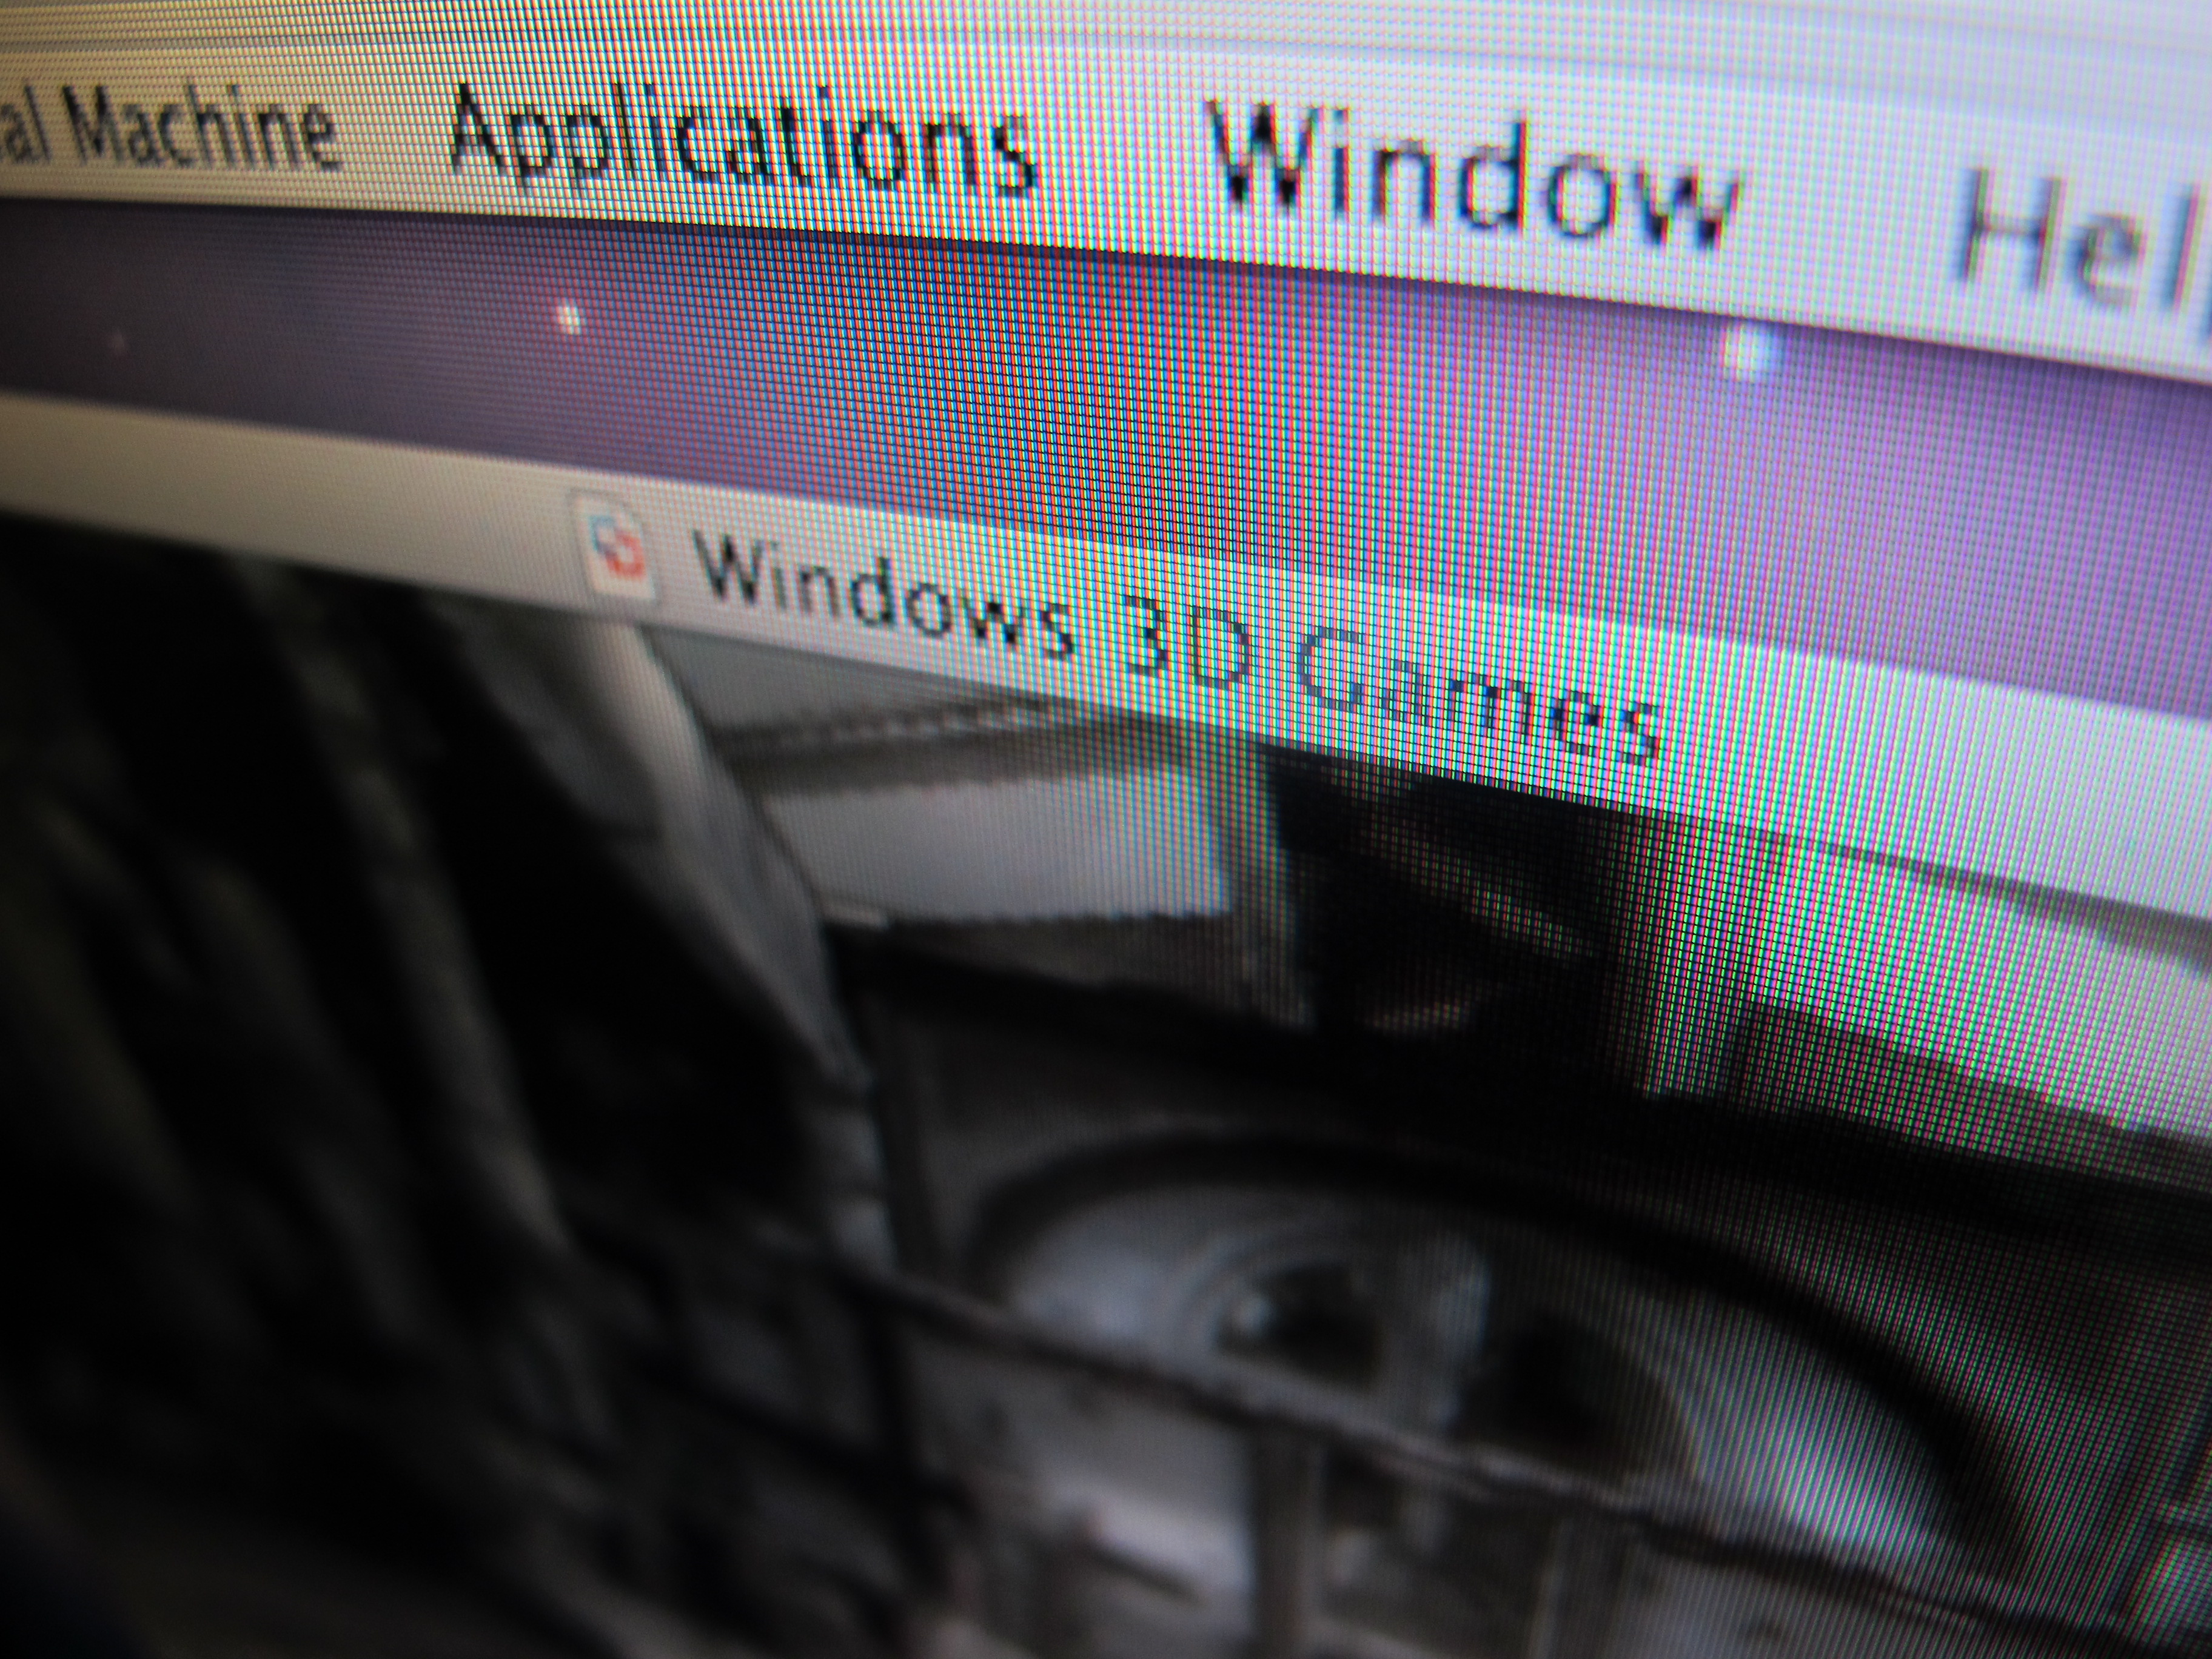
Graphics in VMware Fusion 3 and Workstation 7

I work on the graphics virtualization team at VMware. The company is about to release two new desktop virtualization products: Fusion 3.0 is in beta, with a release coming tomorrow. Workstation 7.0 has a public release candidate available.

There are a lot of exciting features in these releases, and my team has been working really hard on making the graphics virtualization in these releases the best we can. Our focus with these releases has been introducing a few large architectural changes in our graphics stack:

  • A brand new WDDM graphics driver for Windows 7 and Vista.

This is a complete rewrite, sharing no code with our Windows 2000/XP driver. This has been a monumental undertaking for the team, but the results have been pretty shiny. The architecture is clean and extensible, it’s much easier to understand and debug the driver’s performance, and it gives us a good platform to build on for future guest driver releases. Oh, and it can run 3D games with Aero enabled.

  • A brand new OpenGL driver for Windows guests.

Yes, this release has not one but two brand new drivers in it! The new OpenGL driver is based on Gallium, and it finally brings both major graphics APIs into VMware virtual machines. Both of our new drivers really deserve a blog post all to themselves.

  • We’ve been progressively rearchitecting the host-side infrastructure with a project we call “Better Unity and Multi-mon”.

Whereas previous releases of VMware’s products have implemented multi-monitor support and Unity mode on top of an architecture that was fundamentally designed for a single framebuffer, Fusion’s entire graphics stack has been overhauled in order to natively handle multiple screens, windows, and framebuffers. This architecture is common to all of our products, but so far only Fusion 3.0 has had its entire stack updated. Workstation and ESX still use a blend of new and legacy components.

As an end-user, the effects of our Better Unity and Multi-mon project are relatively subtle. Unity mode now renders much more efficiently, and applications like games and media players will run just as fast in Unity mode as they will in single window or fullscreen mode. Window resizing is smoother. We also have a high-quality GPU accelerated scaler which you can see in action on your VM’s live thumbnails in the VM Library window.

Screen Object

Back in April, I announced the VMware SVGA Device Developer Kit. This is an Open Source (MIT-style license) project which documents the virtual hardware interface that our graphics stack uses, and provides a simple reference driver and some examples. If you’re interested in operating system development, graphics, or virtualization, it can be a handy platform to experiment with, and it’s the best starting point if you’re trying to write a VMware graphics driver for a new operating system.

I’ve been trying to maintain the DDK with an open development process. Instead of periodically dumping code, all development takes place directly in the open repository. The one exception to this policy is for code which doesn’t work on released VMware products, either due to serious bugs or unreleased features.

As part of our architectural improvements for Fusion 3 and Workstation 7, we added a pretty big new feature to the SVGA device: “Screen Object”. Without Screen Object, the device has a single framebuffer with a geometry controlled by a set of registers. Multi-monitor support was faked by using an additional set of registers to carve up a single large rectangular framebuffer into individual monitors. With Screen Object, the guest can create “screens” dynamically, and they don’t necessarily need to be backed by any specific kind of memory.

A Screen is really an opaque non-guest-addressable memory object, just like an SVGA3D surface. If a Surface is analogous to a texture or a backbuffer, a Screen is analogous to a frontbuffer. You can blit between system memory and a Screen, and you can blit from Surface to Screen.

This is a simple concept, but it’s a powerful tool that can be used to implement a variety of different memory management and asynchronous rendering strategies. Last week I checked in a pretty big update to the DDK which includes refdriver support for Screen Objects, and 10 new Screen Object-only examples.

To run the examples, you’ll need Fusion 3 or Workstation 7. You’ll also need to manually enable Screen Object. Like many new features, we haven’t enabled Screen Object by default right away. It is enabled automatically for Vista, Windows Server 2008, Windows 7, and Mac OS X guests, since our drivers on those platforms may take advantage of the new features. For improved portability, it is disabled by default on other guest OS types. You can enable it manually by adding a line to your VMX file:

svga.enableScreenObject = TRUE

As always, the DDK is provided as-is, with no official support from VMware. So please don’t bug our support folks 😉 But I’ll try to answer questions as time permits if you send them to micah at vmware.com. Thanks!

Real mode to protected mode inside the timer ISR

This rocks:

https://github.com/scanlime/metalkit/blob/master/lib/bios.c

It’s the insane little trampoline I wrote last year in order to make real-mode BIOS calls from my toy protected mode OS, Metalkit. It’s full of all kinds of awesome and scary things.

So today, I just had occasion to try making a BIOS call from inside the timer interrupt, and it works! (Both in a VMware VM and on the physical laptop I tried it on.) Woohoo!

So now I have this spiffy little app that tests VESA BIOS palette manipulation:

https://github.com/scanlime/metalkit/blob/master/examples/vbe-palette/main.c

Here’s a screenshot of it running in VMware and QEMU. It doesn’t work correctly in QEMU. Not sure why yet- it could just be that their VESA BIOS doesn’t support command 0x09.

If you want to try it yourself (on a VM or a physical machine), here’s a 4 kB precompiled binary. You can either use it as a floppy disk image or a GRUB multiboot image.

(Yes, this is a great example of the sort of dorky thing that gets me excited on a regular basis 😉

GPU Virtualization at WIOV ’08

I just got back from the first
USENIX Workshop on I/O Virtualization.

WIOV was an interesting workshop. It was really nice to see what I/O virtualization looks like from a wide range of different viewpoints. There was some good industry perspective from AMD, Intel, Microsoft, and Oracle. There were also a wide range of academic interests represented. Everyone brings not only their own terminology, but their own idea of which problems are particularly hard or useful to solve.

I did feel like a bit of an outsider, though. Nearly the entire workshop was focused on virtualizing storage and networking devices, which are quite a bit different from the devices I work with on a daily basis: mouse, keyboard, graphics, sound, and USB.

Part of this divide is along server vs. desktop lines, but I also feel like it’s in large part due to the wide difference in status of current virtualization approaches for desktop vs. server devices. Most of the current work on networking and storage devices is in improving manageability, or squeezing out that extra 10-20% of performance overhead. This is all already assuming that there are plenty of known virtualization approaches for those devices which are both correct and reasonably performant.

By contrast, current desktop device virtualization is largely neither correct nor performant. Even simple devices like mouse and keyboard must be fudged with heuristic after heuristic to bridge the impedance mismatch between a low-level mouse/keyboard and the high-level input stack abstraction you see at the windowing system or VNC layer. Sound devices are easy to emulate, but to build a truly correct sound device, you would need guarantees that can only be provided by a hard real-time operating system. USB seems on first glance like it could be simple, but there are huge impedance mismatches to be overcome, and even greater challenges in writing a CPU-efficient emulated USB controller.

I feel that graphics virtualization is the biggest unsolved problem in desktop device virtualization, which is why I enjoy my day job as much as I do. But it also means that graphics virtualization is really at a totally different stage than storage or networking virtualization. Nobody has an implementation that is complete or correct, let alone performant. My team at VMware is pushing the envelope, and the technology is already usable for many people- but there’s a huge amount of work left to be done.

I am very greatful to have had the opportunity to present a paper on graphics virtualization at WIOV ’08. Jeremy Sugerman and I co-authored a paper which describes a taxonomy of graphics virtualization approaches, and provides implementation details and analysis for the approach VMware is currently shipping as the DirectX 9.0 virtualization in VMware Fusion and VMware Workstation. This is currently the most detailed publicly available description of the work my team has been doing over the past 4 years. If you’re interested, I encourage you to read the paper closely. It’s really packed with as much information as we could squeeze into 8 pages.

The presentation followed the structure of the paper, but it was weighted heavily toward describing the motivation for GPU virtualization, the reasons why it’s hard, and the characteristics of the different approaches we outline in our taxonomy.

You can get the paper from the official WIOV ’08 site. You can also grab the paper and the presentation slides from my server:

The slides are also on SlideShare, embedded below.

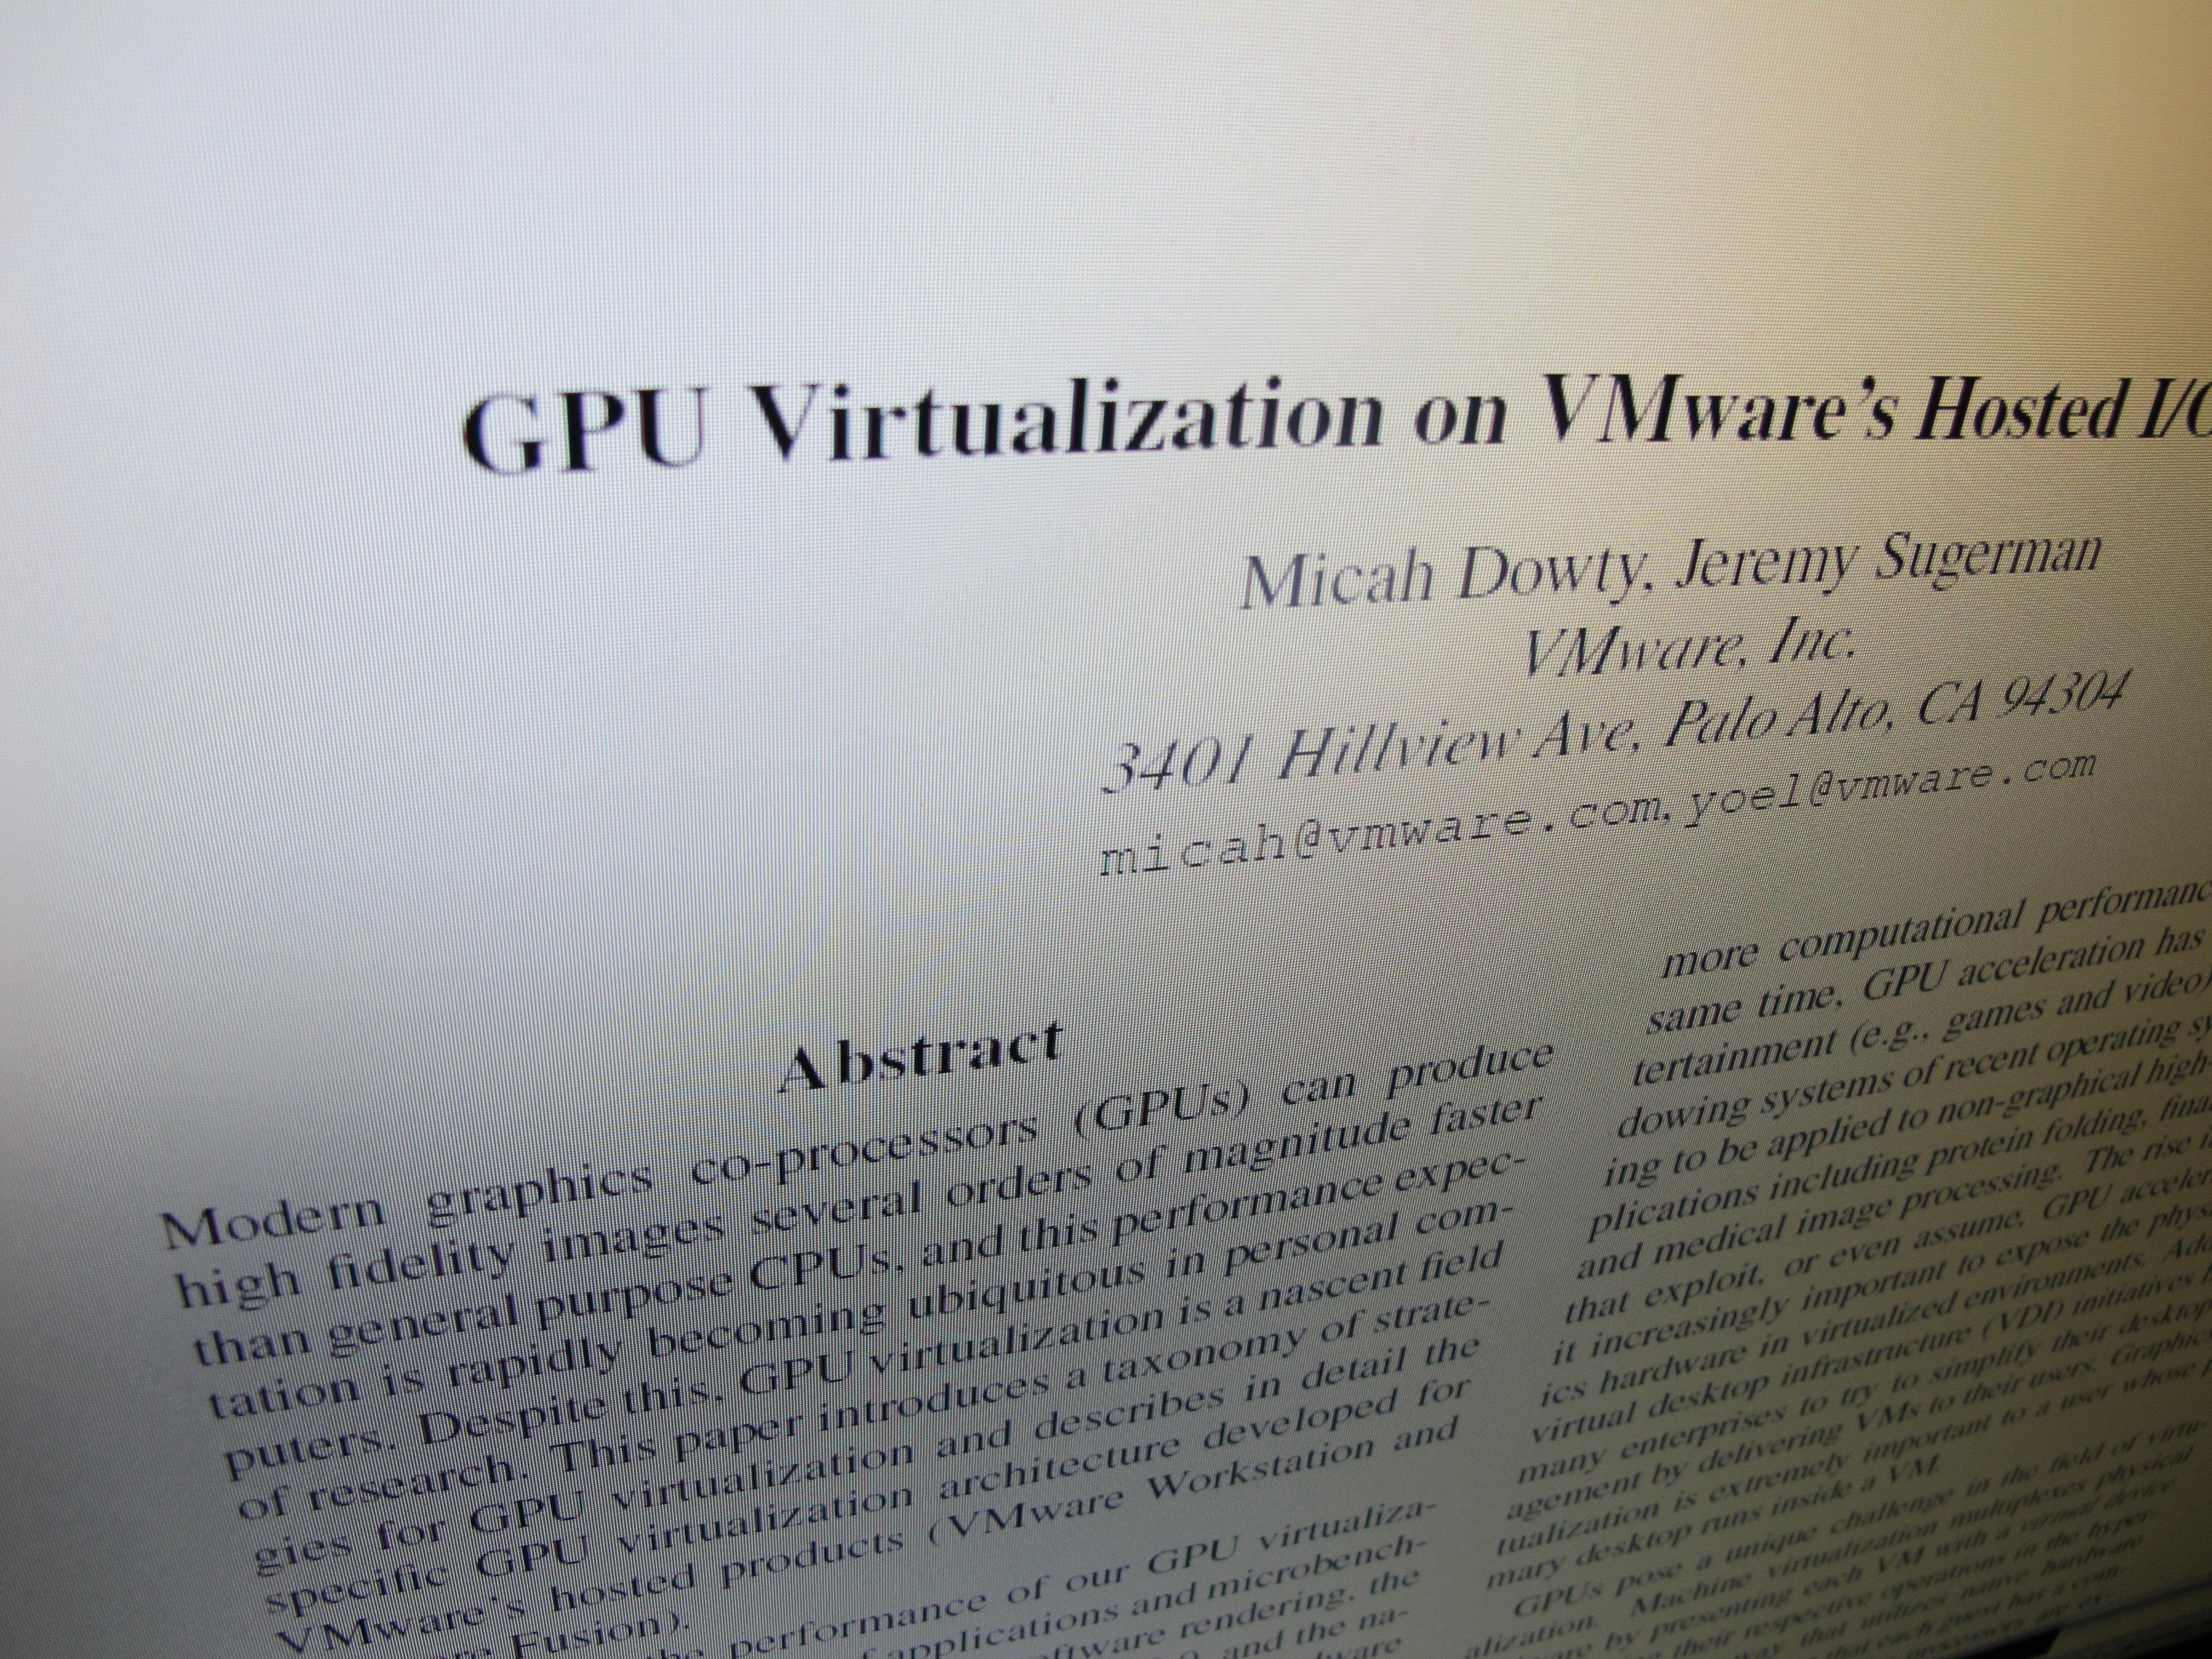
Speaking at USENIX WIOV 2008

Well, this Monday I submitted the final copy of my paper, and yesterday everything was approved. Jeremy Sugerman and I wrote a paper for the USENIX Workshop on I/O Virtualization’s Industrial Practice session: GPU Virtualization on VMware’s Hosted I/O Architecture. We’re on the program for a 15-minute talk at the workshop in San Diego this December.

The paper is a detailed (or as detailed as will fit in 8 pages) description of the GPU virtualization work my team has been doing at VMware for the past couple years. This is the technology that makes it possible to run DirectX 9 applications and games inside your VMware Fusion VM. The paper includes a lot of background information about graphics virtualization, a detailed description of our virtual GPU architecture, and various benchmarks.

Thanks to everyone who helped me by reviewing drafts of the paper. Your feedback has been invaluable.

Update: The paper can now be downloaded in HTML or PDF, and presentation slides are available.

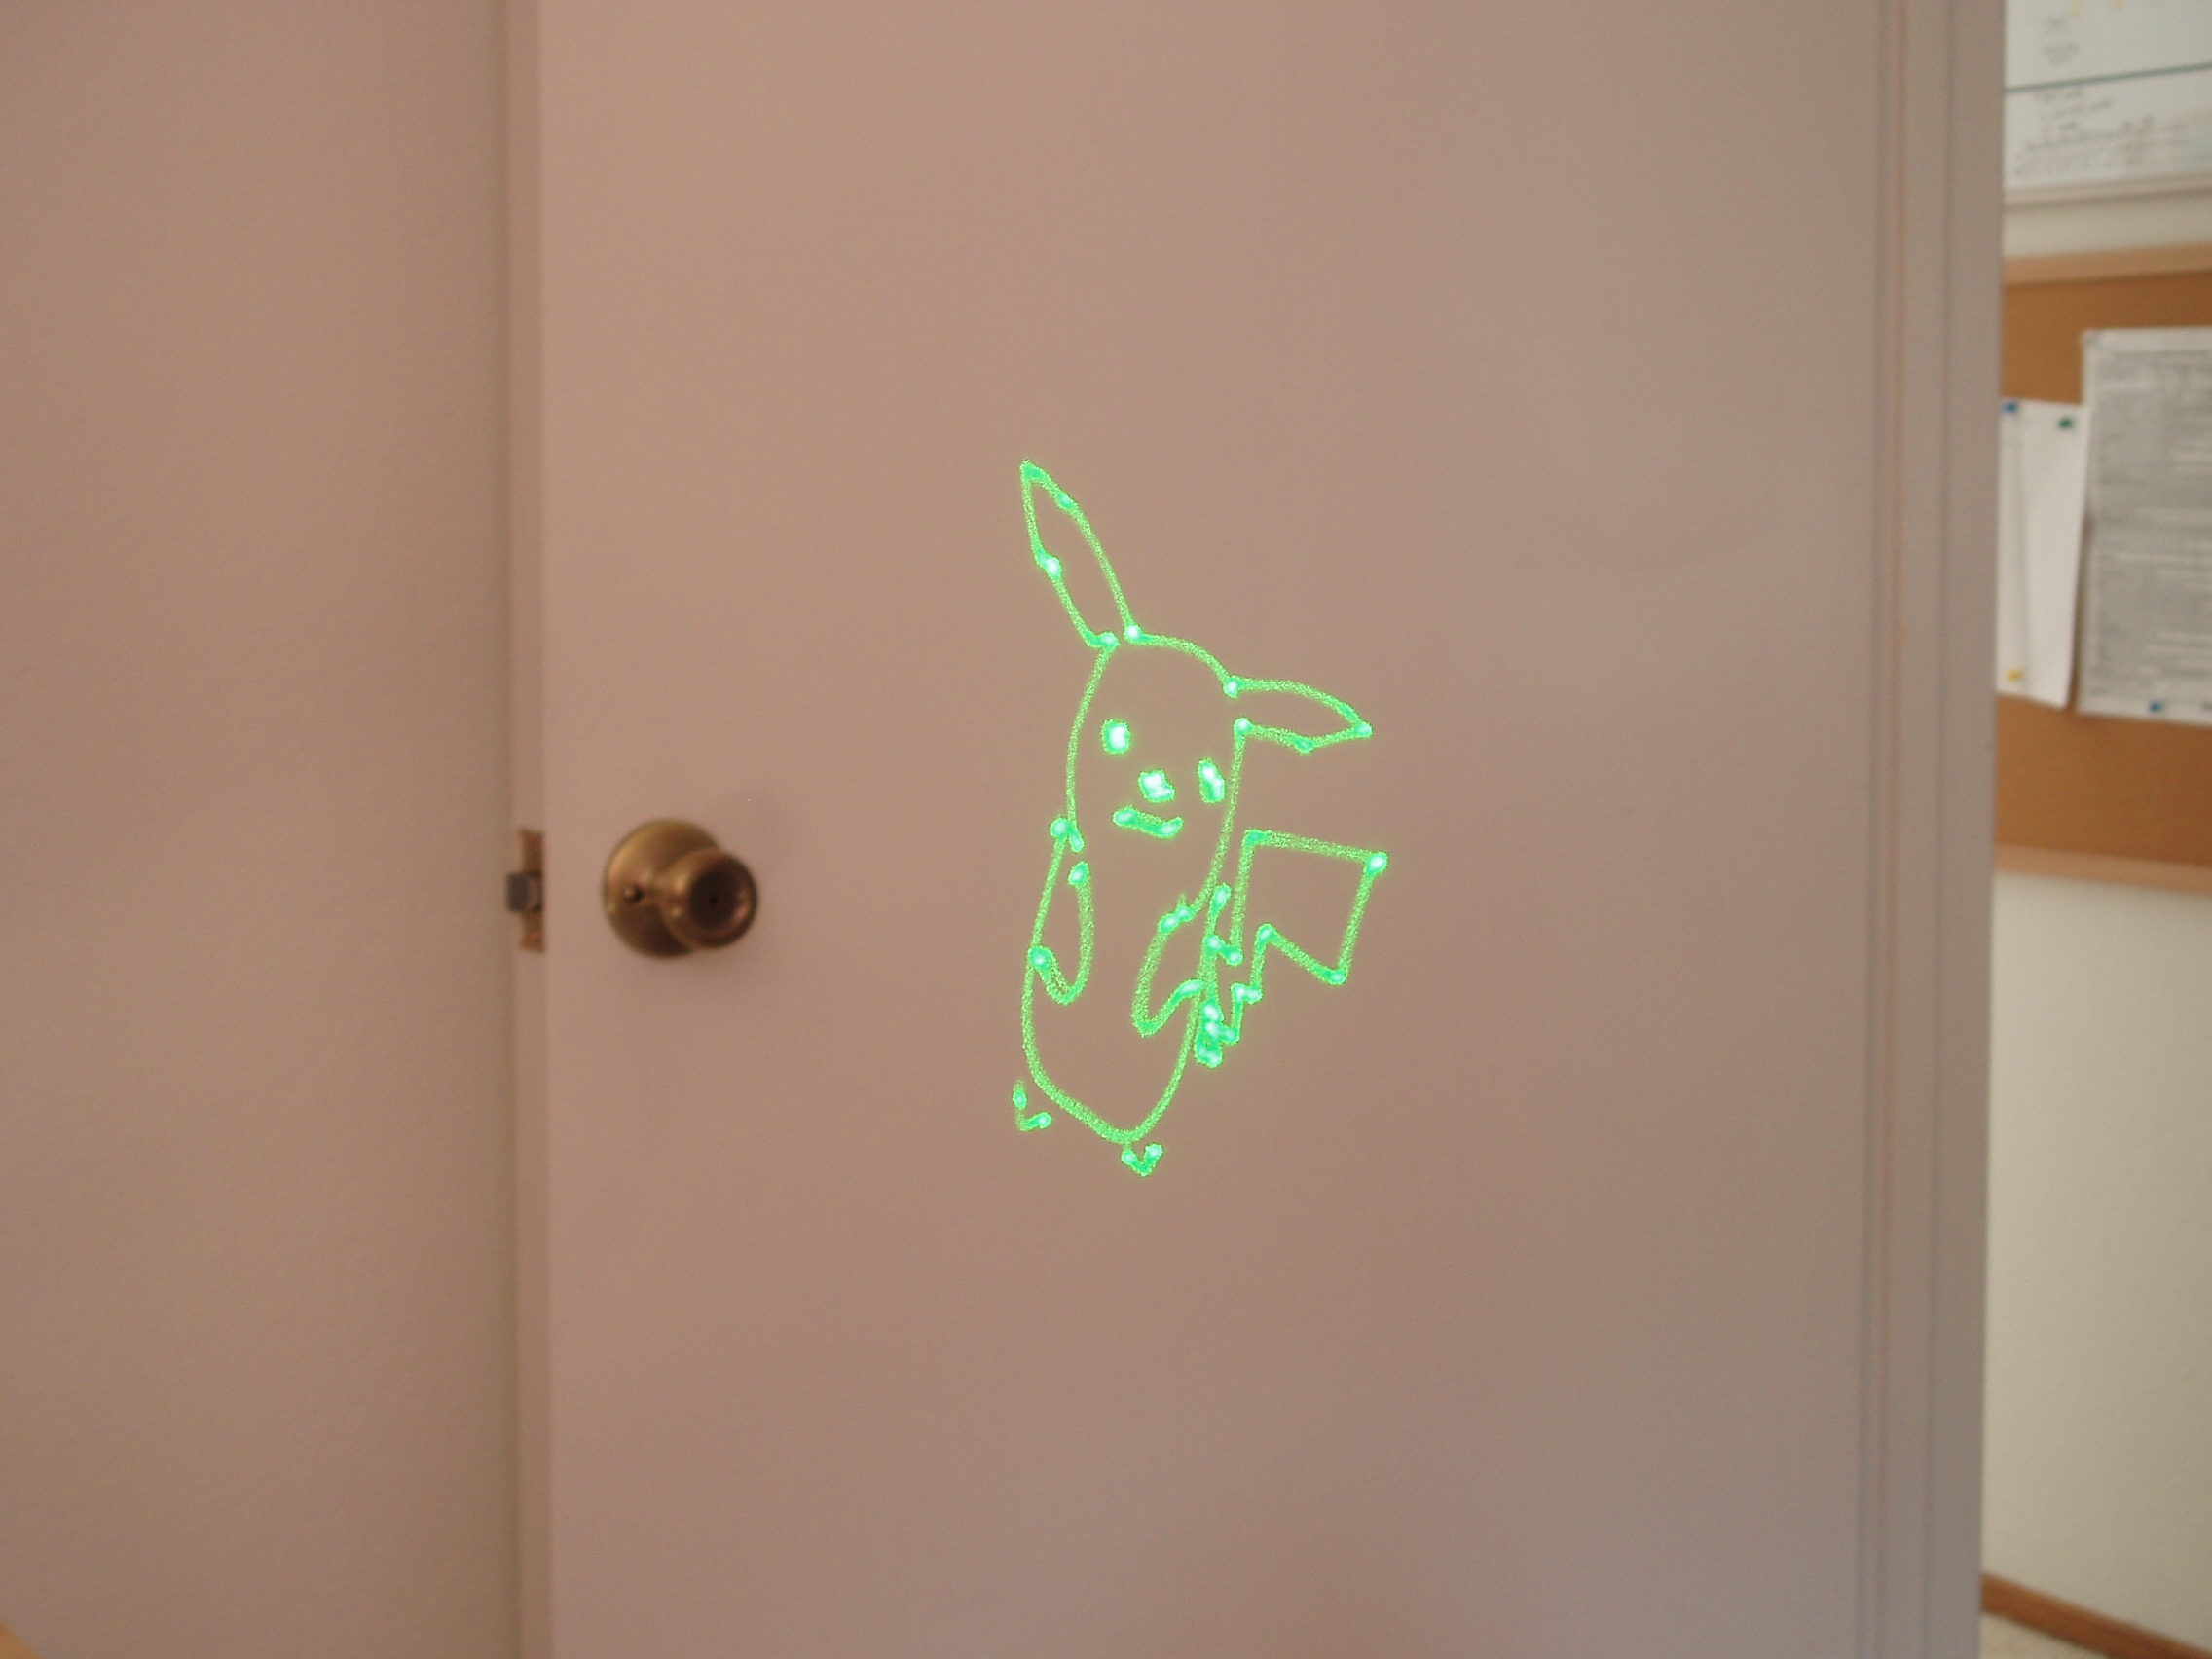
Laser projector update

Looks like my hard disk laser projector made the MAKE blog. Sweet 😉

I’ve been hacking on the software for the projector quite a bit this week- mostly on the code responsible for importing and converting vector graphics data.

In a typical laser projector, you have a high-speed DAC connecting a pair of analog servo amplifiers to a computer. The computer reads samples out of an ILDA file, maybe applies some effects in real-time, then sprays them out of the DAC. In my projector, I wanted a more sophisticated approach- mostly because of the relatively low-bandwidth Bluetooth link that exists between my projector and the PC.

My solution was to create a simple vector graphics virtual machine. The virtual machine runs on the projector’s microcontroller, in lockstep with the servo loops. It has three registers- a position register, a first-order accumulator, and a second-order accumulator. It isn’t turing-complete, but there are instructions to load these registers, wait for a number of samples to elapse, etc. It can interpolate quadratic Bézier curves in hardware. The VM also supports instructions like “jump”, and “increment counter”. This lets it support fairly complex queueing and double-buffering systems.

So far, I have code to:

  • Load paths from an SVG file
  • Convert those paths (lines, quadratic Bézier curves, and cubic Bézier curves) into my “VectorMachine” instructions.
  • Simulate the VectorMachine, and display a visual representation of the samples that the hardware will generate.
  • Queue up instructions for completed frames, using both a local and remote (in the firmware’s memory) queue. The queue has bounded latency, and it lets me flawlessly stream animated vector graphics over Bluetooth to the device.

There are some areas for improvement, like automatically optimizing the path the laser takes when it’s blanked. This could be fun- it’s actually a travelling salesman problem. I also don’t have a good way to get animation, or programatically generated graphics into it. But, it loads simple SVG files, and it does an okay job at it. It does a decent job at rendering Kirby at a blazing fast 8 FPS.

I think it’s time to take a break from this project while I figure out what to do with it next. Maybe music visualization, or Flash animations?

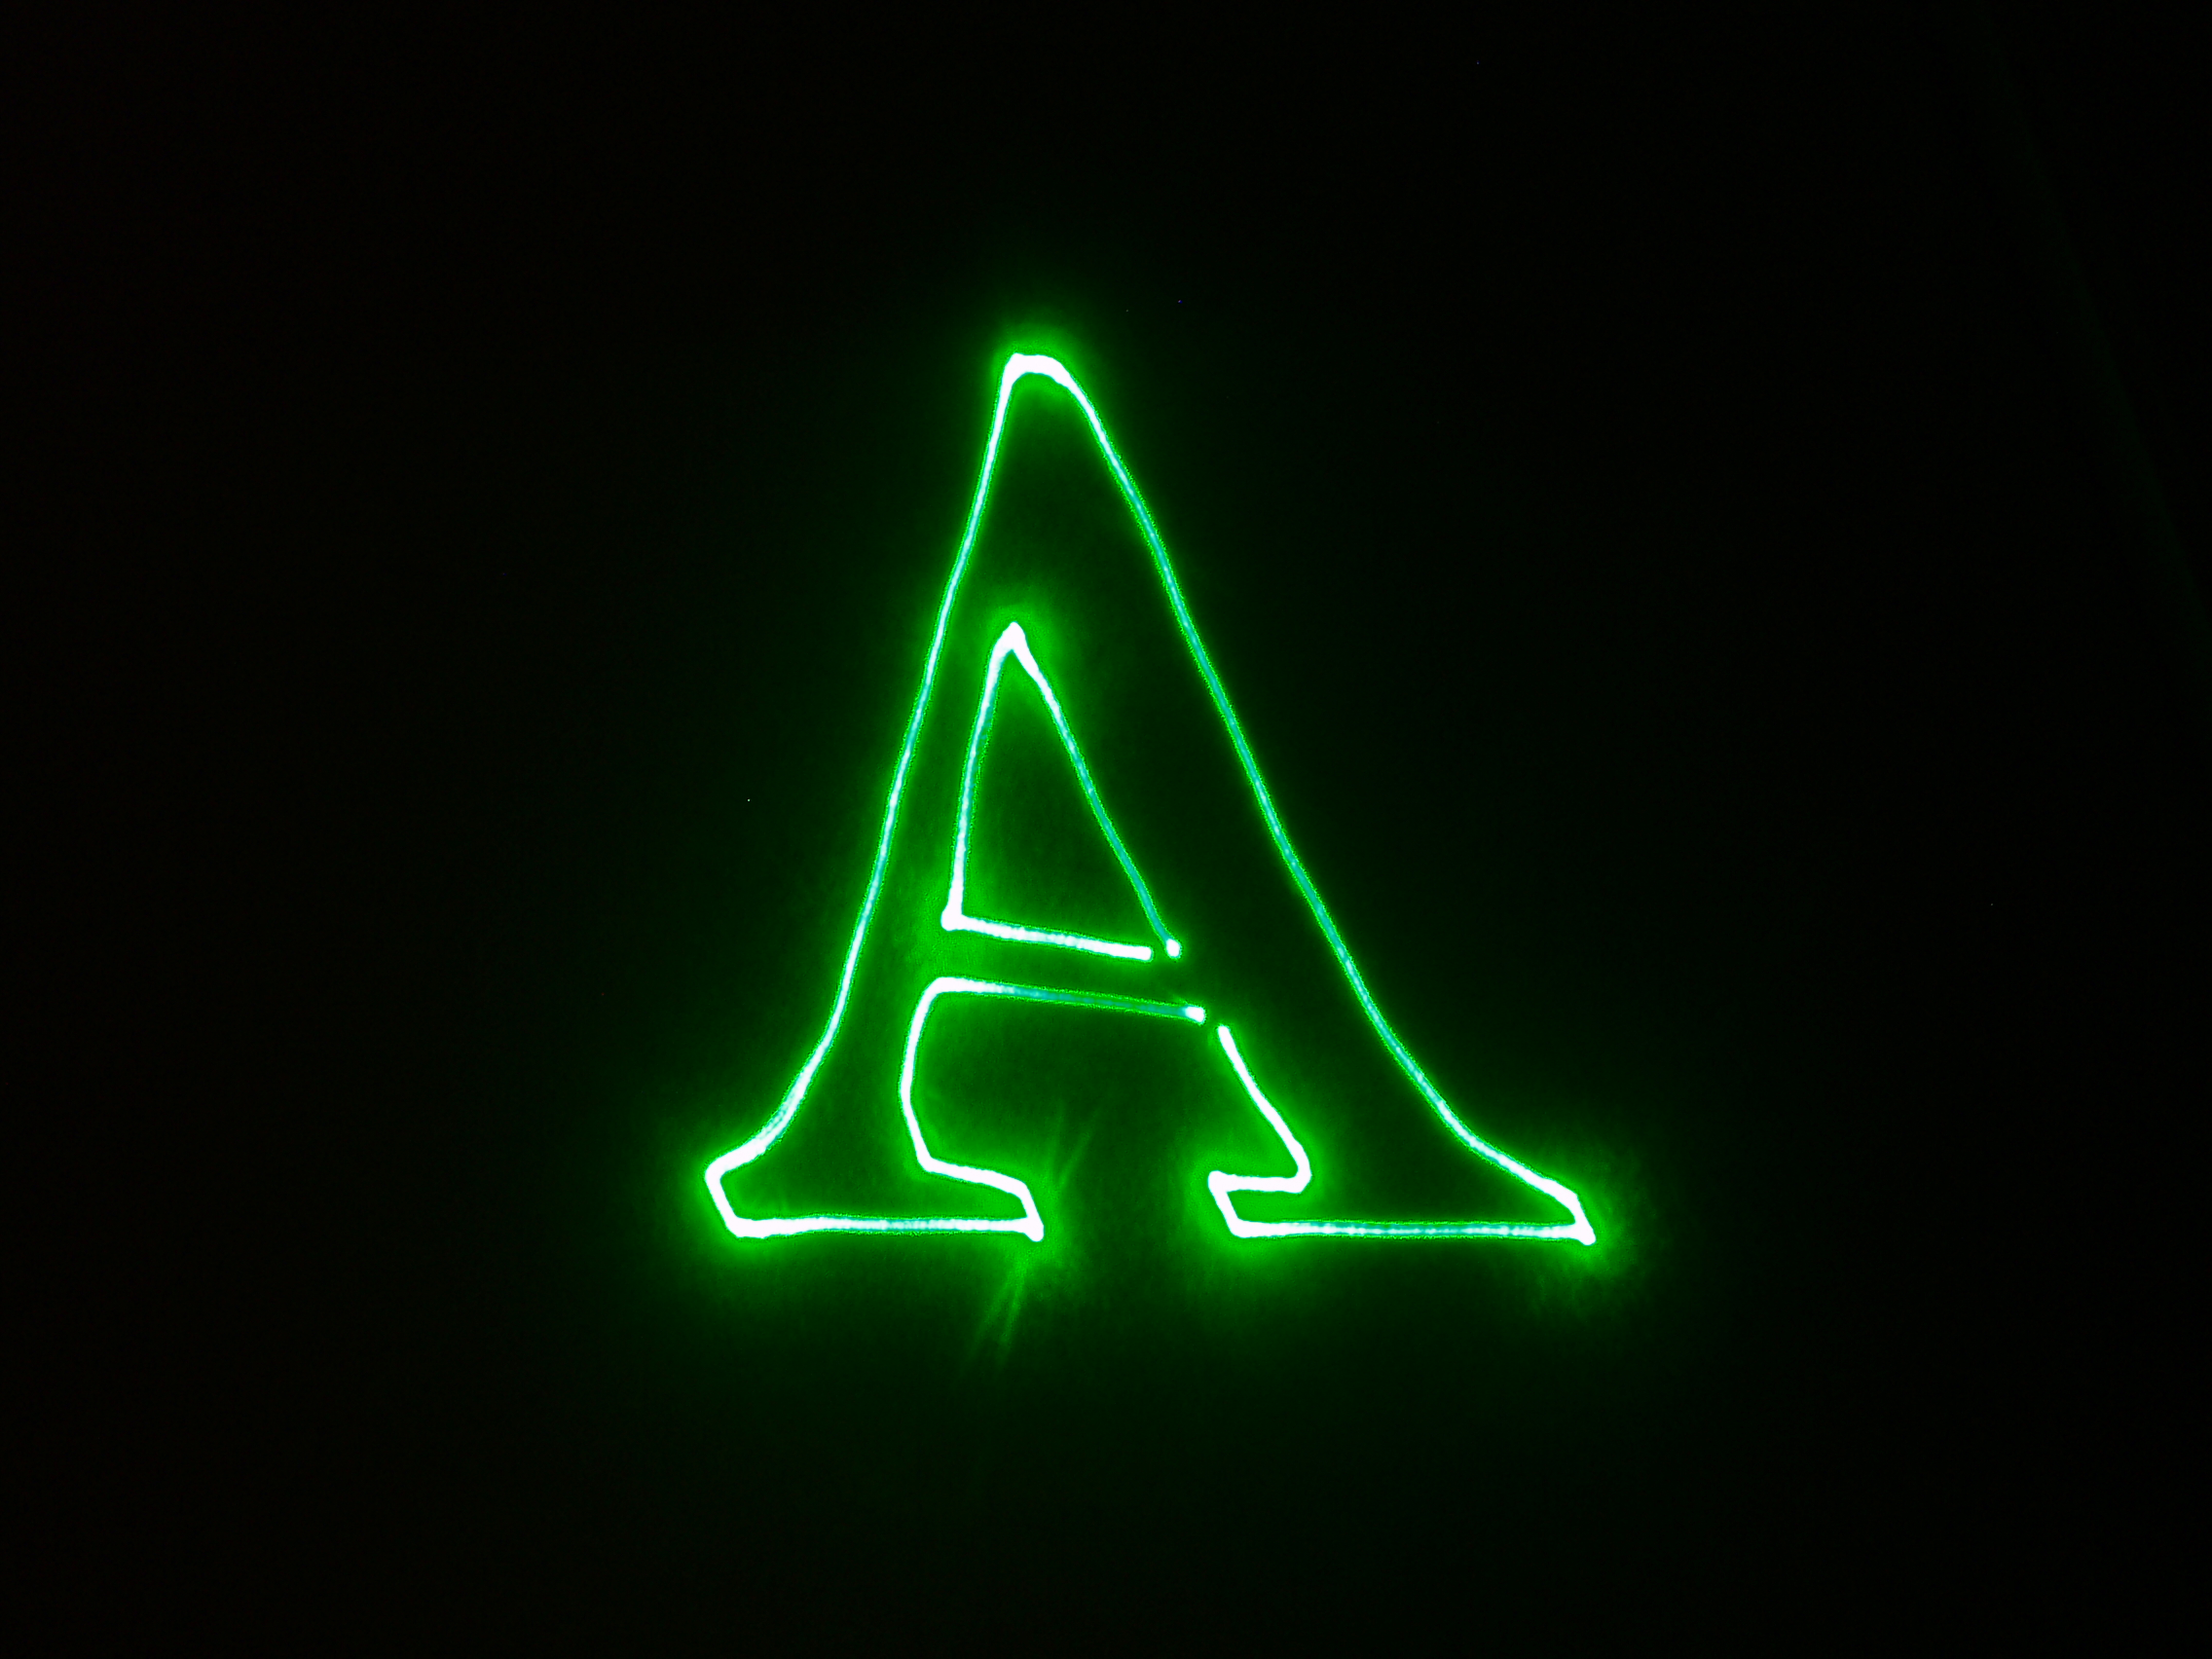
Times New Roman at 532 nanometers

After running the ILDA test pattern at only 4K on my hard disk laser scanner, I really wanted to see how well the projector would do with the kinds of “real” vector graphics that I expected to be able to display. Most commercial ILDA frames are way too complicated for it.

As I mentioned, the control software for the projector still mostly sucks. I have a hacked-together ILDA frame importer, and a little interactive scribbly-widget. I really want to be able to integrate it with Inkscape, or even just give it an SVG importer so I can send single frame images from Inkscape to the projector. This will probably mean writing an SVG parser in Python which generates VectorMachine instructions for my laser projector. Fun.. but pretty complicated. (Oh, lazy web, does anyone know of an existing SVG parser that would be good at such a thing? Preferably written in Python?)

In the mean time, I just tried some crazy Russian shareware to generate ILDA files that I then run through my importer. The results aren’t too bad:

The “A” is very stable, and I can display it quite smoothly. (I don’t know the exact frame rate.) The “Hello World” flickers really badly- it’s probably only refreshing a couple times per second.. but it’s still readable.

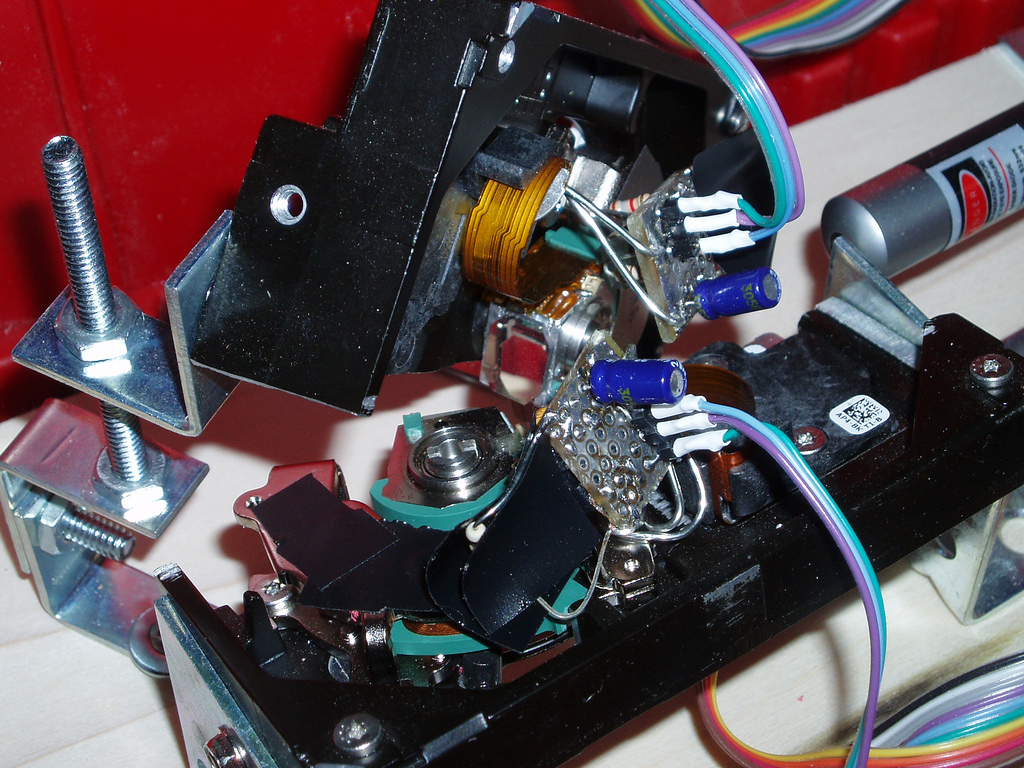
Hard disk laser scanner at ILDA 4K

I should have blogged about this long ago, as I’ve been working on it off and on for about three months now, but today I reached an arbitrary milestone that compels me to post 😉 I’m still actively working on this project, so I’ll try to make updates occasionally, and if I end up putting together an actual project web page I’ll link it from here.

My latest tinkery hardware and embedded systems project is a homebrew laser scanner. You know, the kind you see at planetariums- sweep a laser beam around on the wall really fast, and draw vector graphics. Commercial laser scanners have been around for decades now, but buying a complete system is still really pricy, even on eBay. Besides, where’s the fun in that?

There are plenty of examples of homebrew laser scanners on the internet. Many people have wired up a pair of loudspeakers, hard disk actuators, or other readily available mechanisms to an amplifier and used them for simple laser graphics. This will make some pretty wiggly patterns on the wall, but it isn’t a real vector graphics display. The best example I know of for a totally built-from-scratch laser projector (not using commercial galvo actuators) actually uses custom hand-wound galvanometers. Very nice.

So, this has been done before, but I still find it an interesting project. This is actually my third attempt at a laser scanner. My first one I built when I was in my early teens, when solid state lasers were first starting to become “affordable”. I pointed my shiny new $40 laser diode module, dimmer than today’s $5 laser pointer, at a few spinning mirrors on cheap DC motors. Instant laser spirograph, with basic speed control over the parallel port of my 8086 PC.

About 4 years ago, in college, I made my second attempt. This one used a cheap red laser pointer, fragments of scrap mirrors, and a couple of old hard disks hot glued together. The mechanical parts were shoddy, but the electronics were worse. It had an extremely low-power open loop amplifier, and it couldn’t draw much more than circles.

This being my third try, I figured I had to get it right. I still stuck to my original goals:

  • Only readily available off-the-shelf mechanical and electronic parts.
  • Simple hardware, powerful software.
  • Performant enough to display low- or medium-complexity vector graphics.
  • Portable.

And, this was the result:

To differentiate it from all the other hobby laser projectors out there, it has a pretty nice set of features:

  • Compact and portable.
  • All digital. In the whole project, no board-level analog signals are present.
  • Based around the Parallax Propeller multi-core microcontroller.
  • Optical position sensors, for closed-loop servo feedback.
  • High-power 30mW green laser, with software-adjustable brightness level.
  • Bluetooth interface. The only external wire is power.
  • Vector graphics virtual machine. To efficiently send graphics data over the relatively slow Bluetooth link, frames can be encoded using a simple instruction set which lets the projector itself perform line and curve interpolation.

The internals:

  • Two hard disk voice coil motors (VCMs) with front-silvered mirrors.
  • Position sensors: Each consists of two LEDs (one stationary, one moving) and a TSL230R light-to-frequency converter chip.
  • Temperature sensors: Dallas DS18B20 1-wire sensors, mounted on the magnet bracket for each VCM.
  • Laser module: A dangerously bright 30mW green laser from DealExtreme.
  • Control electronics: A Propeller prototype board with two LMD18200 H-bridges to drive the VCMs, a Darlington transistor to drive the laser, Bluetooth module from Spark Fun, and a few resistors and capacitors. That’s all.

So, the hardware is really simple. Building this projector involved a lot of cutting, gluing, and soldering- but building a second one could probably be done in a weekend. The complexity is in the software, and especially the firmware. The on-board microcontroller is responsible for reading and filtering the light sensor data, updating the servo loop for each VCM at 40 KHz and generating pulse-width modulation at several MHz, reading the temperature sensors, generating laser brightness control PWM at up to 80 MHz, decoding the vector graphics instruction stream, communicating over the Bluetooth link, and supervising the whole operation so we don’t melt a VCM coil or shear any end-stops in half- all simultaneously. The Propeller, luckily, has 8 symmetric processing cores. This project keeps all of them busy.

I’m just barely at the point where I can start conducting meaningful testing that shows me the projector’s true limits. The hardware and firmware are feature-complete, but the desktop software does little more than provide a pretty wxPython UI for high-level control and calibration. So far I’ve been testing it with simple hand-drawn shapes, which the control software can resample for constant laser velocity.

Today I wrote an importer for the ILDA Image Transfer Format, and tried running the industry-standard ILDA Test Pattern. The pattern is designed for a speed of 12K (12000 points per second), but modern commercial laser scanners can typically run it at 30K or higher.

Well, it looks like my projector currently maxes out at about ILDA 4K. Compared to a modern commercial scanner, this sucks, but it’s not bad for a couple of hard disks. I’ll have to try tweaking my servo loop some more (or cranking up the VCMs from 12 volts to 24, maybe with liquid cooling 😉 to see if I can go any faster, but this is certainly enough precision and speed to draw words, shapes, and hopefully some simple animated characters. (Kirby, Yoshi, maybe a spinning Parallax Propeller beanie…)

I’ll keep working on the software, and posting new photos as I make progress. The latest firmware (written in Spin and Assembly) and client software (in Python) are available in Subversion, with an MIT-style license.

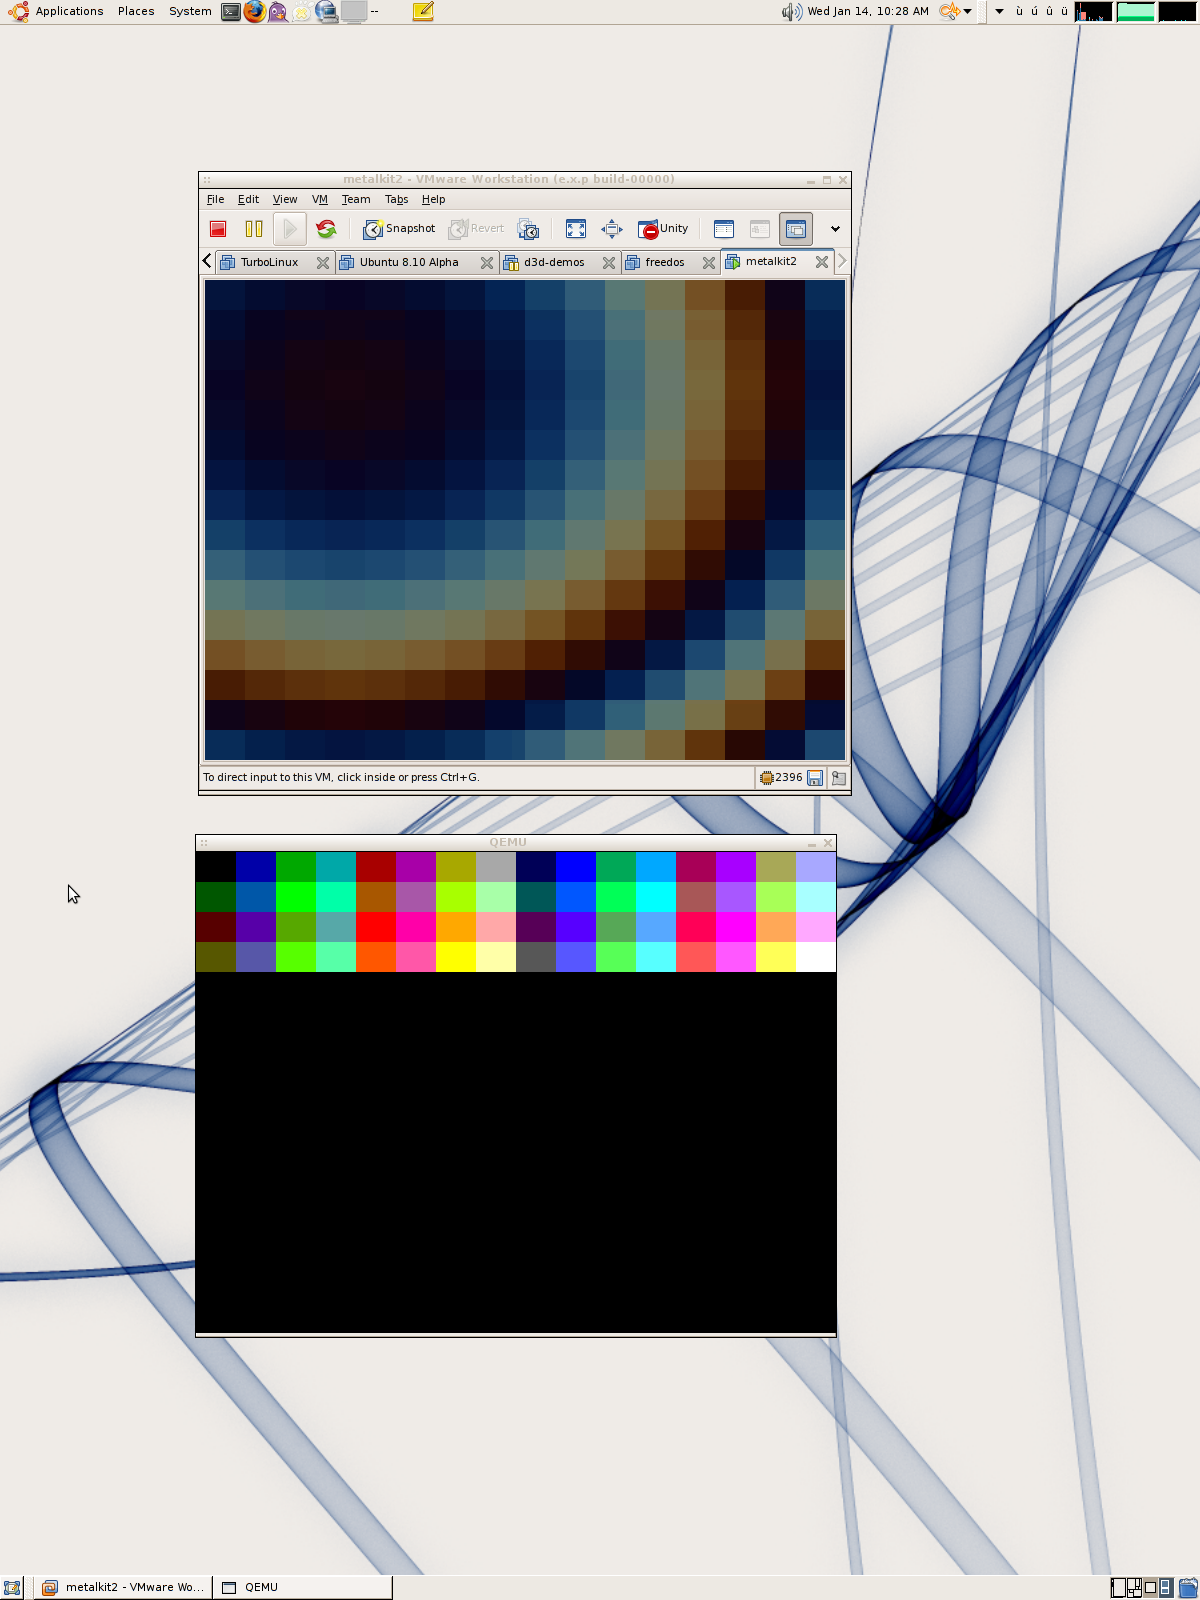
3D Graphics at VMware

Despite all the random posts about helicopters and embedded systems on here, I haven’t really mentioned what I spend most of my time on these days…

I work in the Interactive Devices group at VMware. For people who aren’t familiar with VMware’s products, we do virtualization: software that lets you run multiple virtual computers inside your real computer. It’s good for data center management and consolidation, but I’m most interested in the ways virtualization can be used on the desktop: It’s great for running Windows apps on your Linux box, or running Windows/Linux software on your Mac using Fusion.

And that’s where our team comes in. While much of the company is focused on doing higher-level tools (user interfaces, management software, APIs) or on infrastructure that primarily benefits server products, our team is really in the heart of the virtualization technology that makes VMware tick on the desktop. We virtualize all the random desktop peripherals like the mouse, keyboard, video card, and sound card- but our team’s two big projects are USB and 3D graphics.

I’ve been working at VMware for close to 3 years now. I spent about the first half of that on USB. I did much of the work in implementing USB 2.0, and I did the original port of our OS-specific USB code to Mac OS X prior to the first release of VMware Fusion. I also implemented Isochronous transfer support (for web cams and the like), and did a lot of neat internal testing infrastructure.

I found VMware’s USB project really interesting because it meshed well with my prior experience with embedded systems and creating USB hardware. It was also a good introduction to the challenges in creating virtual hardware devices for a VM, particularly for hardware with such an un-virtualization-friendly architecture.

I still keep tabs on USB at VMware, but lately I’ve been pretty absorbed with our 3D virtualization effort.

For some background: VMware products provide their virtual machines with a “VMware SVGA device”, a made-up video card which provides legacy emulation of VGA and VESA BIOS modes, plus a vendor-specific set of 2D and 3D acceleration features. We provide drivers for this card as part of VMware Tools, and they come with recent versions of Xorg.

Our most recent releases of VMware Workstation and VMware Fusion include 3D acceleration support which is roughly on par with Microsoft DirectX 8.1, but it’s buggy in a lot of ways and it’s missing key features. Needless to say, the 3D team hasn’t been twiddling its thumbs. Our legal department won’t let me disclose exactly how much progress we’ve made or what features we will support in future products, but I can say that I’m very excited about our current work.

3D graphics virtualization is a really complex and interesting problem. Fundamentally what we’re doing is a Direct3D to OpenGL API translator (much like what the Wine project has) but it’s complicated by the fact that we also have to behave like a video card, and we also have to get the data into and out of a Virtual Machine efficiently. All said and done, the actual 3D API translation issues are only part of the story. There are also a lot of interesting resource management and synchronization problems.

It’s a really interesting project and we’re making some great progress, but we also have one big problem:

Our team is tiny. We have a substantial amount of work to do- it’s like writing a major 3D graphics driver (think ATI or NVidia), writing a game engine, and writing a complex interprocess communication system all rolled into one. Right now we have 7 developers on the project, and it feels like we could use 70.

So, if you know anyone who has a passion for 3D graphics, who knows low-level systems programming inside and out, who isn’t afraid of single-stepping through machine code in the debugger: take a look at our job postings (search for OpenGL) or send a resume to micah at vmware dot com.