

I’ve been working on a project lately that I’m really eager to share with the world: A kit of hardware and software parts to make LED art projects easier to build and better-looking, so sculptors and makers and multimedia artists can concentrate on building beautiful things instead of reinventing the wheel. I call it Fadecandy.

Fadecandy isn’t a one-size-fits-all solution. It’s an easy way to get started and an advanced tool for professionals. It’s a collection of simple parts that work well together:
- Firmware that uses unique dithering and color correction algorithms to raise the bar for quality while getting out of the way of your creativity.
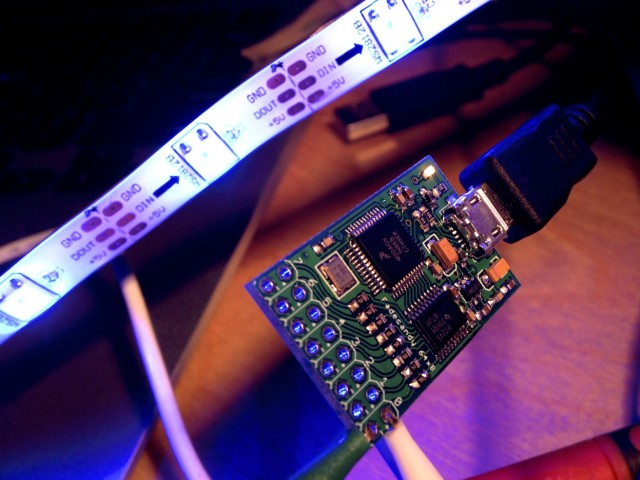
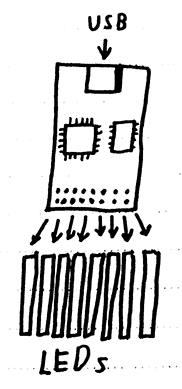
- Open source hardware for connecting cheap and popular WS2811 based LEDs to a laptop, desktop, or Raspberry Pi over USB.
- The Fadecandy server software, which communicates with one Fadecandy board or dozens. It runs on Windows, Linux, and Mac OS, and on embedded platforms like Raspberry Pi.
- The Open Pixel Control protocol, a simple way of getting pixel data from your creative tools into the Fadecandy server.
- Libraries and examples for popular languages. We have Python and Processing already, with Javascript and Max coming soon.
- And of course, the LEDs themselves! Fadecandy works with popular WS2811/WS2812 LEDs available from Adafruit, SparkFun, and AliExpress. Each controller board supports up to 512 LEDs, arranged as 8 strips of 64 each.
 Fadecandy is designed to enable art that is subtle, interactive, and playful, exploring the interplay between light, form, and shadow. If you’re tired of seeing project after project with frenetic blinky rainbow fades, you’ll appreciate how easy it is to create expressive lighting with Fadecandy.
Fadecandy is battle-tested. The firmware was originally developed to run the Ardent Mobile Cloud Platform, a Burning Man project which used 2500 LEDs to project ever-changing rolling cloud patterns onto the interior of a translucent plastic sculpture. It used five Fadecandy boards, a single Raspberry Pi, and the effects were written in a mixture of C and Python. The lighting on this project blew people away, and it made me realize just how much potential there is for creative lighting, but it takes significant technical drudgery to get beyond frenetic-rainbow-fade into territory where the lighting can really add to an art piece instead of distracting from it.
Example
Fadecandy is designed to be really easy to build good-looking effects with. Here’s a really simple example of what you can do with only a few lines of Processing code:
OPC opc;
PImage dot;

void setup()
{
  size(640, 360);

  dot = loadImage("dot.png");

  // Connect to the local instance of fcserver
  opc = new OPC(this, "127.0.0.1", 7890);

  // Map an 8x8 grid of LEDs to the center of the window
  float spacing = height / 16.0;
  opc.ledGrid8x8(0, width/2, height/2, spacing, 0);

  // Put two more 8x8 grids to the left and to the right of that one.
  opc.ledGrid8x8(64, width/2 - spacing * 8, height/2, spacing, 0);
  opc.ledGrid8x8(128, width/2 + spacing * 8, height/2, spacing, 0);
}

void draw()
{
  background(0);

  // Change the dot size as a function of time, to make it "throb"
  float dotSize = height * 0.6 * (1.0 + 0.2 * sin(millis() * 0.01));

  // Draw it centered at the mouse location
  image(dot, mouseX - dotSize/2, mouseY - dotSize/2, dotSize, dotSize);
}
You can help!
Fadecandy is still in its infancy. I’ve been building it as fast as I can, but what it really needs now is community. This is you!
Ways you can help:
- Peruse the project’s Github Repository
- Join the discussion group
- Start a discussion about your project idea. I may be able to give you a free board to beta-test!
- Share this blog post
- Share photos of the project
- Run the Fadecandy firmware on a Teensy 3 board. You’ll miss out on the robust power supply included on a real Fadecandy board, but you can get started right away!
Where is this going? I’m currently polishing the software, making examples, and writing documentation. I have a small number of prototype boards at the moment, but my plan is to do a larger manufacturing run soon and retail the boards online. Maybe this will be a Kickstarter, or maybe they’ll show up in popular hobbyist electronics shops. Time will tell, and I need everyone’s help.