Cube64 GameCube to N64 Adaptor

Enjoy retro N64 games, but can’t stand the controller? That’s the situation I found myself in about 7 years ago, back in 2004. So I built an adaptor, to use Game Cube controllers on the N64.

The adaptor hardware is very simple- all you need is a PIC microcontroller. I originally designed the project to work with the very popular at the time PIC16F84A, or some smaller 8-pin chips. It bit-bangs both protocols, so you don’t need any more hardware than a tiny ยตC, a couple resistors, and optionally either a voltage booster or battery pack to run the “rumble” vibration motor.

I had a lot of fun building it, since it was an opportunity to reverse engineer a protocol that, as far as I could tell, had never been documented publicly. There were many web sites explaining the basics of the N64 and Game Cube protocols- enough to talk to the controllers with your own hardware. But there was significantly more to learn about emulating an N64 controller, since there are many features that you don’t really need to use the controller, but which games will use. The N64 also has the added complexity of having a memory card slot. The controller implements a protocol that tunnels SRAM reads/writes over the controller wire. Peripherals like the Rumble Pak pretend to be SRAM, but are actually memory-mapped I/O devices.

This is a very old project, but I thought I’d do a quick post with an update on it. I never really released the project, I just quietly posted the source code and the CIA feed. Since then, many others have found the project and built their own.

I recently heard from Jacques Gagnon, who went a step farther. He was frustrated by a few lingering bugs, most notably lack of support for the WaveBird wireless controllers. So he pulled the project into Google Code and has been hacking away! WaveBird controllers work now, and he’s added several other new features, such as the ability to store multiple sets of button mapping layouts in memory.

If you’re still interested in this classic gaming platform and you’d love to have your own Cube64 adaptor, I highly encourage you to check out Jacques’ work. The adaptors are easy to build, especially if you already have some experience with microcontroller programming.

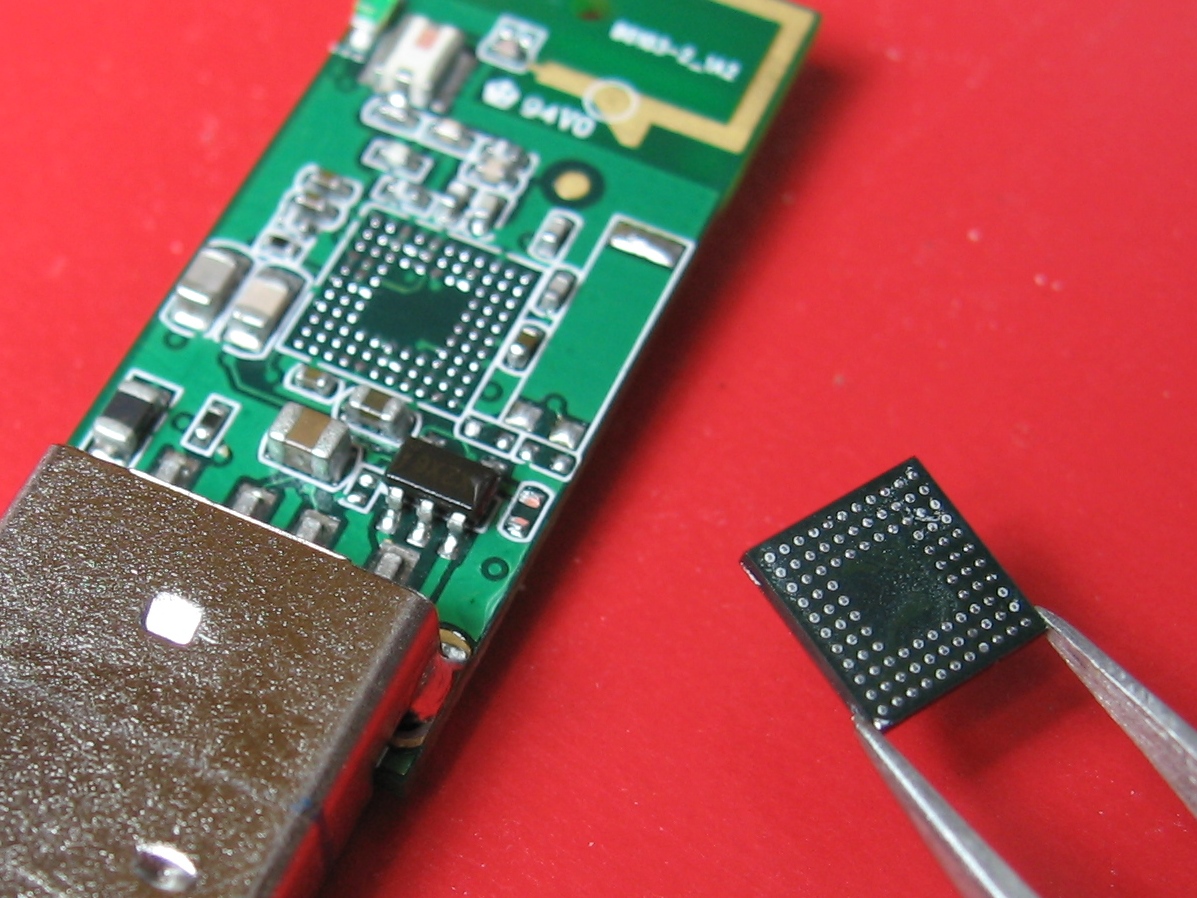
DSi hacking, BGA rework

I got a Nintendo DSi earlier this month. It’s a really cute little console, and a nice revision to the DS Lite. Screens are slightly larger, CPU is about twice as fast, 4x the RAM. And of course it has these camera thingies. Other folks have teardowns online with internal photos aplenty ๐Ÿ™‚

So, I spent a week or so tooling around with the DSi doing normal consumer and/or homebrew things with it. Played some The World Ends With You, got an Acekard 2i and tried running some homebrew. Its DS compatibility mode seems to be pretty good. The only compatibility bug I bumped into was running my work-in-progress Robot Odyssey port. It mostly worked, but there was a little bit of crackling in the audio. Not surprising, I’m doing the audio in a somewhat unconventional way, and it doesn’t work properly in any DS emulator either ๐Ÿ™‚

The DSi is pretty cute, but it would be nice if we could use its new features for homebrew software. It would be especially cool if you could run homebrew directly from its built-in SD card reader, without the need for any special-purpose hardware. That would really open the door to some cool indie games that nearly anyone could play.

Need to satisfy my curiosity, then. Out come the jewler’s screwdrivers, antistatic mat, and SMD rework tools…

There are a few other people working on hacking the DSi from other avenues. Team Twiizers just released a video of a save game exploit that they’re using to run code in DSi mode. This is pretty cool, and as far as I know it’s the first time a hobbyist has been able to run code in DSi mode. I’m not sure how much if any of the new hardware they’ve managed to reverse engineer through this hack.

There are also a handful of Wii hackers that have noticed that the DSi has pretty much the same file format for its downloadable games, so they’re trying to come up with a way to install homebrew DSiWare apps. Unfortunately, they need the system’s private key- and brute-forcing it doesn’t seem too promising. One way to get this private key would be to extract it from the DSi’s firmware.

The thing that interests me the most right now is figuring out how the DSi boots. There are plenty of other layers of software that you can exploit from the outside- but the bootloader and built-in firmware seems like the best starting point for any serious effort to reverse engineer the DSi’s hardware.

The DSi has upgradeable firmware, and there’s only one visible place that it could be stored: a 256 MB NAND flash chip. This is actually an embedded MMC (eMMC) chip from Samsung. It’s electrically pretty much the same as an MMC card, but in a tiny BGA form factor. It is wired directly up to the CPU, which would indicate that there is some kind of hardware or software bootloader that knows how to pull code off of the eMMC chip during early boot. This probably means there’s a mask ROM in the same package as the CPU. It would also make sense that this ROM would know how to write an initial firmware image to the eMMC chip during manufacturing, since there is no other way to access the eMMC chip after it’s soldered to the DSi’s main board.

I was hoping that the MMC data lines would be accessible via some of the many test points. None of them were obviously related to the NAND, though. I tried probing the SPI bus, where the original DS kept its firmware, but the eMMC chip was definitely on a separate bus. It didn’t help at all that the DSi refuses to boot unless every single one of its peripherals are attached, so this makes it rather hard to poke around the board’s test points while it’s running.

At this point I assumed that the traces running from eMMC chip to CPU were completely buried. My last recourse: desolder the eMMC chip, and hook it up to some kind of test jig that would let me read back its contents. Then perhaps I could copy it to a normal MMC card, and wire up an MMC socket on the DSi.

After practicing my BGA rework technique a bit, I desoldered the eMMC chip. If you power the DSi on without the eMMC chip, it displays a nice hexadecimal error code. This would seem to indicate that there is indeed a mask ROM in the CPU package- a hardware bootloader wouldn’t be smart enough to display a “nice” error like this.

Under the NAND flash

There was a pleasant surprise underneath the eMMC chip: All of the data signals were in fact accessible on nearby components or vias. I didn’t find them earlier, since I couldn’t really poke around with the ‘scope and have the board access the eMMC at the same time. But, armed with this knowledge, I could switch to a simpler approach: Solder the eMMC chip back on, then build a passive sniffer that tells me exactly what reads and writes the DSi’s CPU makes.

By some miracle, I managed to get the eMMC chip soldered back on successfully. The DSi’s mainboard is a huge pain to do BGA rework on, at least with the tools I have. It has so many ground/power planes and fills that the board is really hard to keep hot with just a hot-air rework tool.

My poor DSi then is ‘mostly’ back in one piece. Now I’m working on the next step: Hooking up an FPGA that can dump all the memory reads/writes over USB ๐Ÿ™‚

More stuff: There are a few more pictures on flickr, and I started a thread with a few more technical details on the gbadev forums.

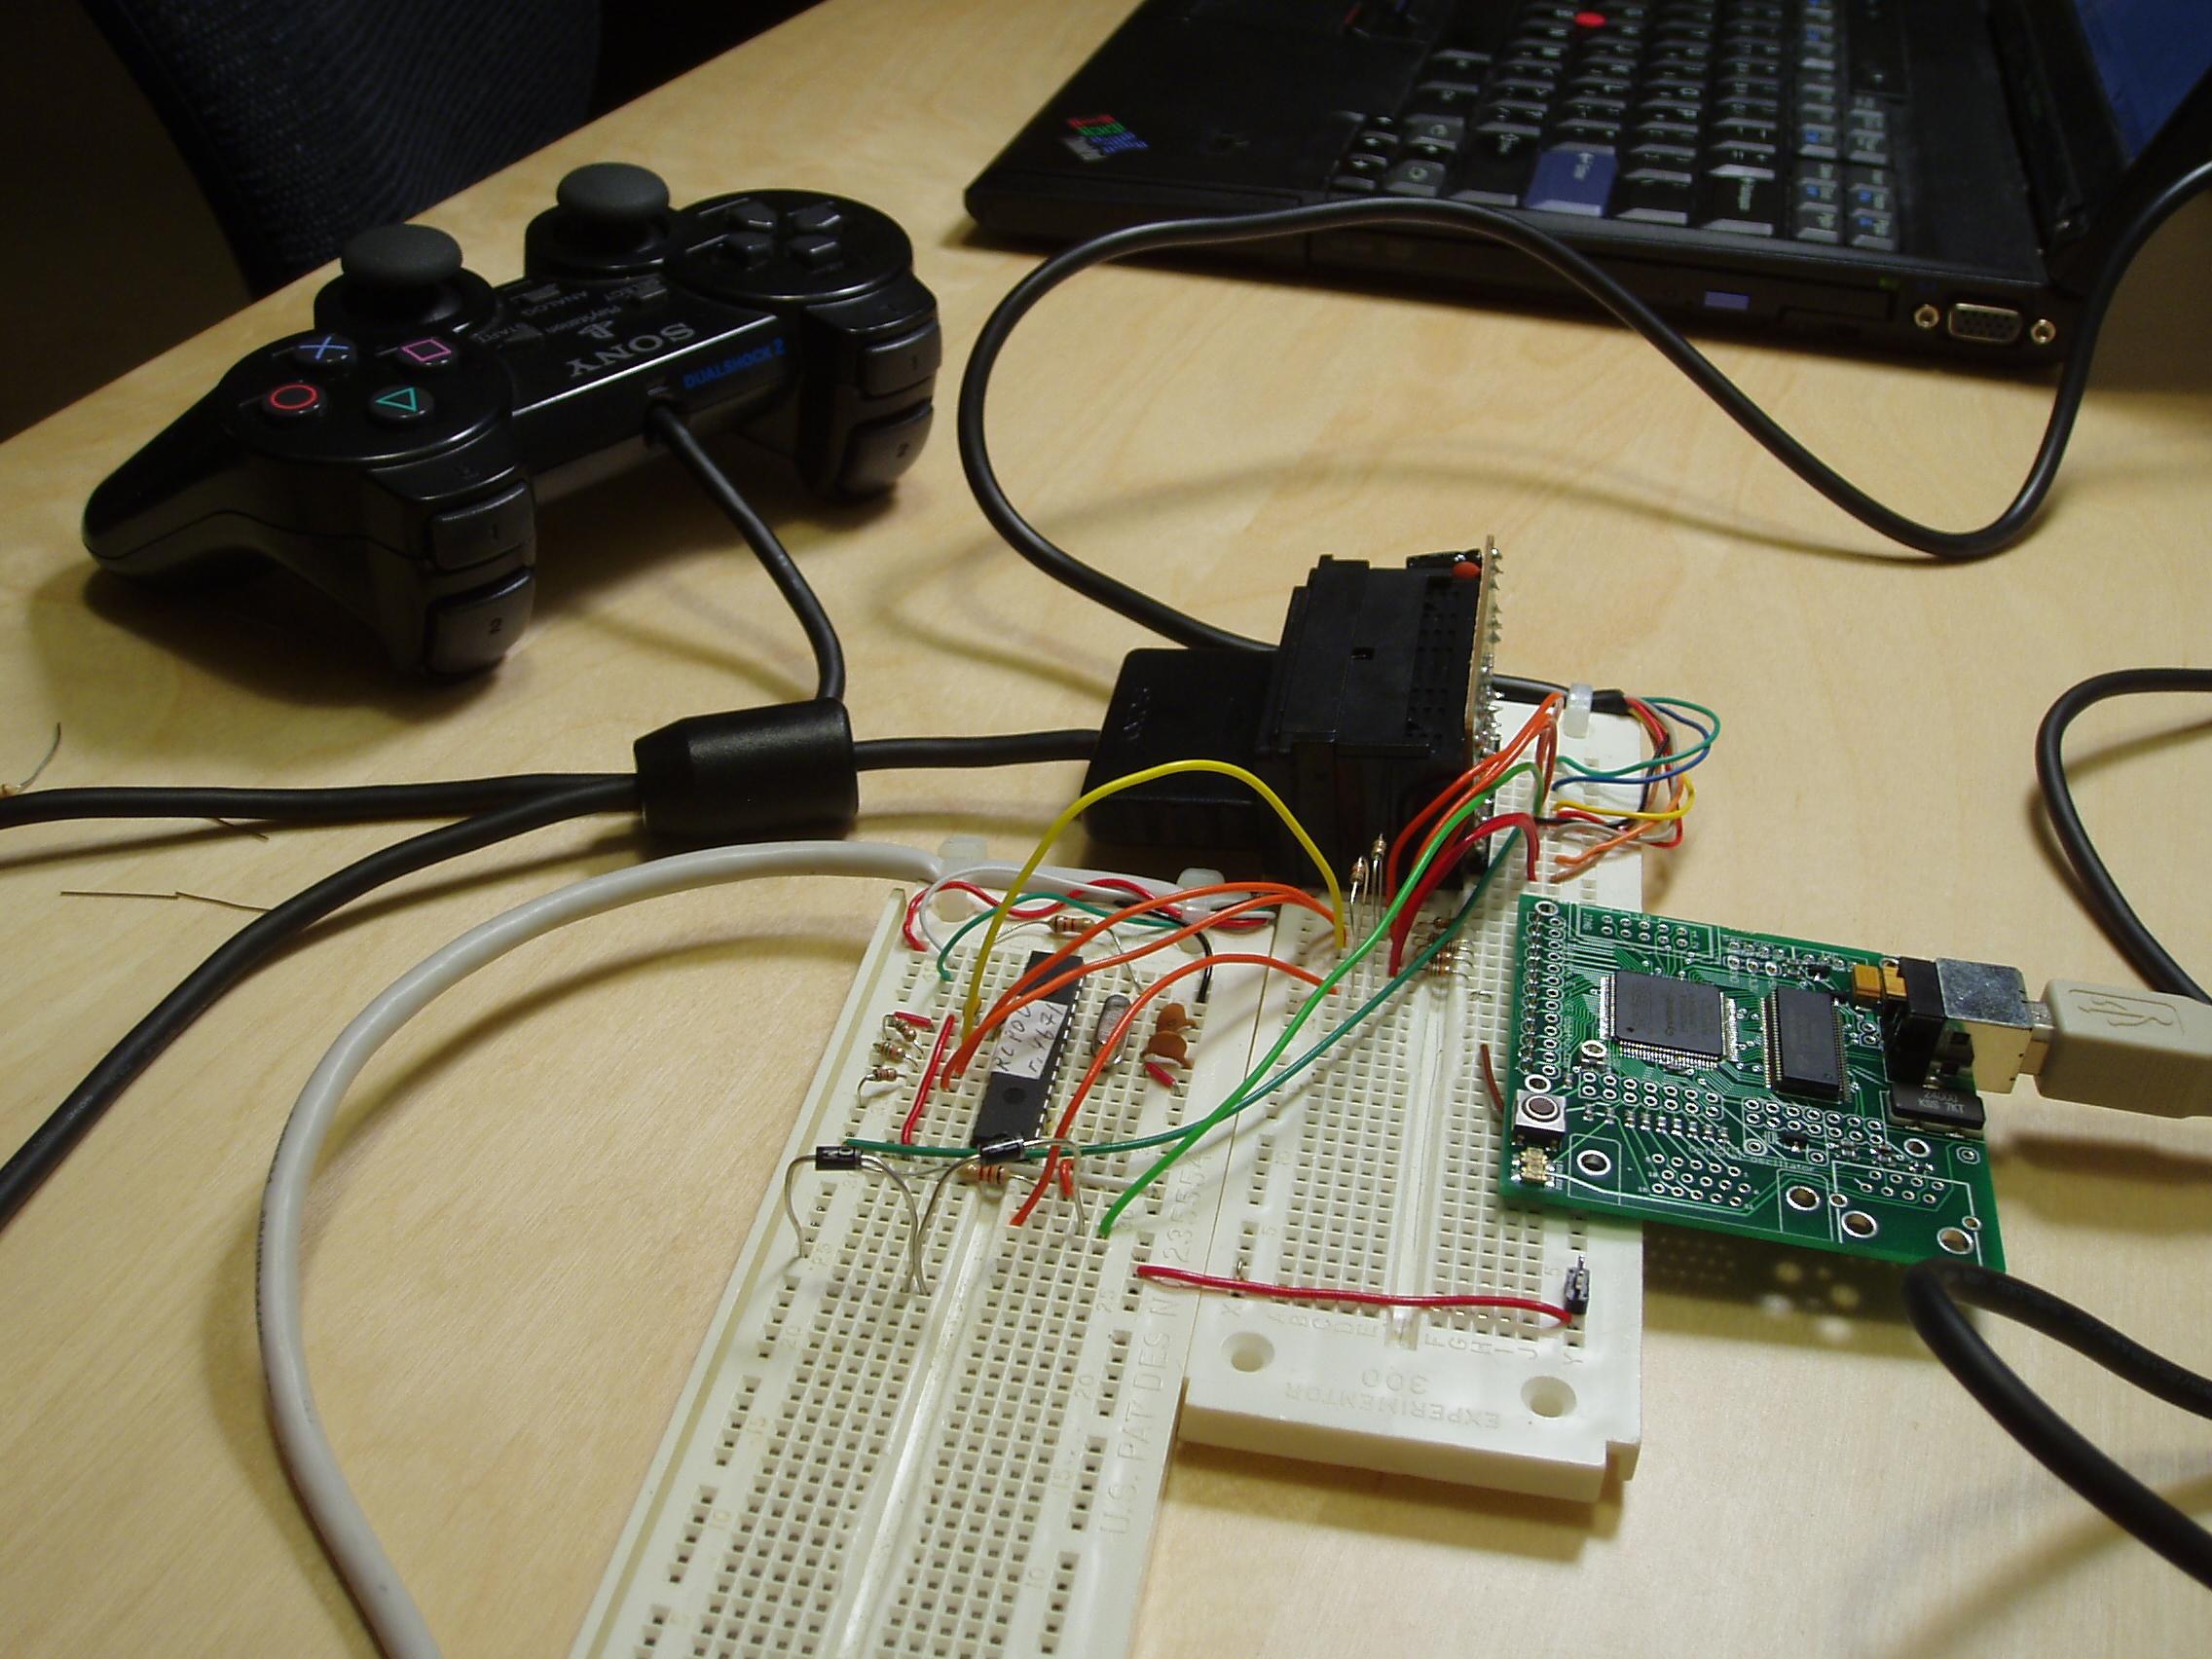
Hardware hackery and the Dual Shock protocol

The hardware-tinkering mood I’ve been in lately shows no sign of subsiding. The theme this time: Everything over cat5.

Backing up a bit… It’s summer! Hooray. So, how does one make the most of the season without actually doing something crazy like going outdoors? Of course the answer is to play video games in a different room which has more fresh air and a better view of the day-star.

Some people would pick up the Playstation and move it to the other room, but my solution is to run the video over inexpensive cat5 cable. This isn’t a new idea, or even a complicated one, but component-video-over-cat5 baluns still sell for around $80 each! I recently made my own pair out of a couple more altoids tins and some parts from the junk drawer.

These work really well. There is a little bit of ghosting visible on a black screen, but during normal use the quality looks perfect, or at least no worse than the quality of the TV it’s connected to. Unfortunately, and I started testing it with a little Megaman 2 and quickly noticed an unrelated problem: the distance is a little too much for our wireless controllers. Time to build a Playstation-controller-over-cat5 extender.

I can think of three different approaches for building such an extender:

  1. Purely electrical: Each PSX signal gets an RS-422 driver and a separate twisted pair. This is very simple, but it would require two cat5 cables per controller! I want at least two controllers running over a single cable.
  2. Low-level multiplexing: Compress multiple signals onto each twisted pair by multiplexing below the protocol level. This would be bit-for-bit identical to plugging a controller in locally, but it has a few big disadvantages. It requires quite a fast clock on the twisted pair, since it requires several bits of information to be sent for every bit in the original protocol. It also doesn’t add any flexibility. You couldn’t, for example, add a crossbar switch for controllers which could let you switch one controller between multiple video game consoles via a button combination.
  3. High-level multiplexing: The console-end of the link includes an FPGA which fully emulates one or more Dual Shock controllers. The controller-end consists of a microcontroller that polls a bank of controller ports and sends updates over an RS-485 link to the FPGA. This is very powerful, and it’s the method used by my old Unicone (Universal Controller Emulator) project. Unfortunately, it’s also relatively complex and it introduces a few milliseconds of latency.

I’m currently working on (3), but I haven’t ruled out (2) completely. First step, I need to know how to emulate a Dual Shock controller. The internet is full of pages that describe the very basics of the Playstation controller protocol, but I couldn’t find a single document that described the protocol in anywhere near enough detail to emulate a controller properly. Time for some reverse engineering…

This was quite a lot like the job I did a while ago to reverse engineer the Nintendo 64 controller protocol enough to build a microcontroller that could emulate a controller. Instead of an HP logic analyzer borrowed from work, this time I have a Saxo board from fpga4fun acting as a real-time Playstation packet sniffer. I should be able to use the same packet sniffer setup to finish reverse-engineering the Playstation 2 memory card protocol so that I can add PS2 support to my psxcard USB adaptor. ๐Ÿ™‚

A Verilog core to emulate the Dual Shock controller will hopefully be coming up soon. In the mean time, I published my Notes on the Playstation 2 Dual Shock controller protocol. It’s actually surprisingly more complex than I was expecting. There are several backward-compatibility features, two rumble motors (one with 8-bit speed control), analog buttons… The protocol has several features that the Dual Shock controller doesn’t take advantage of, like support for 254 different force-feedback actuators that you can arbitrarily map into your polling packets. Crazy.

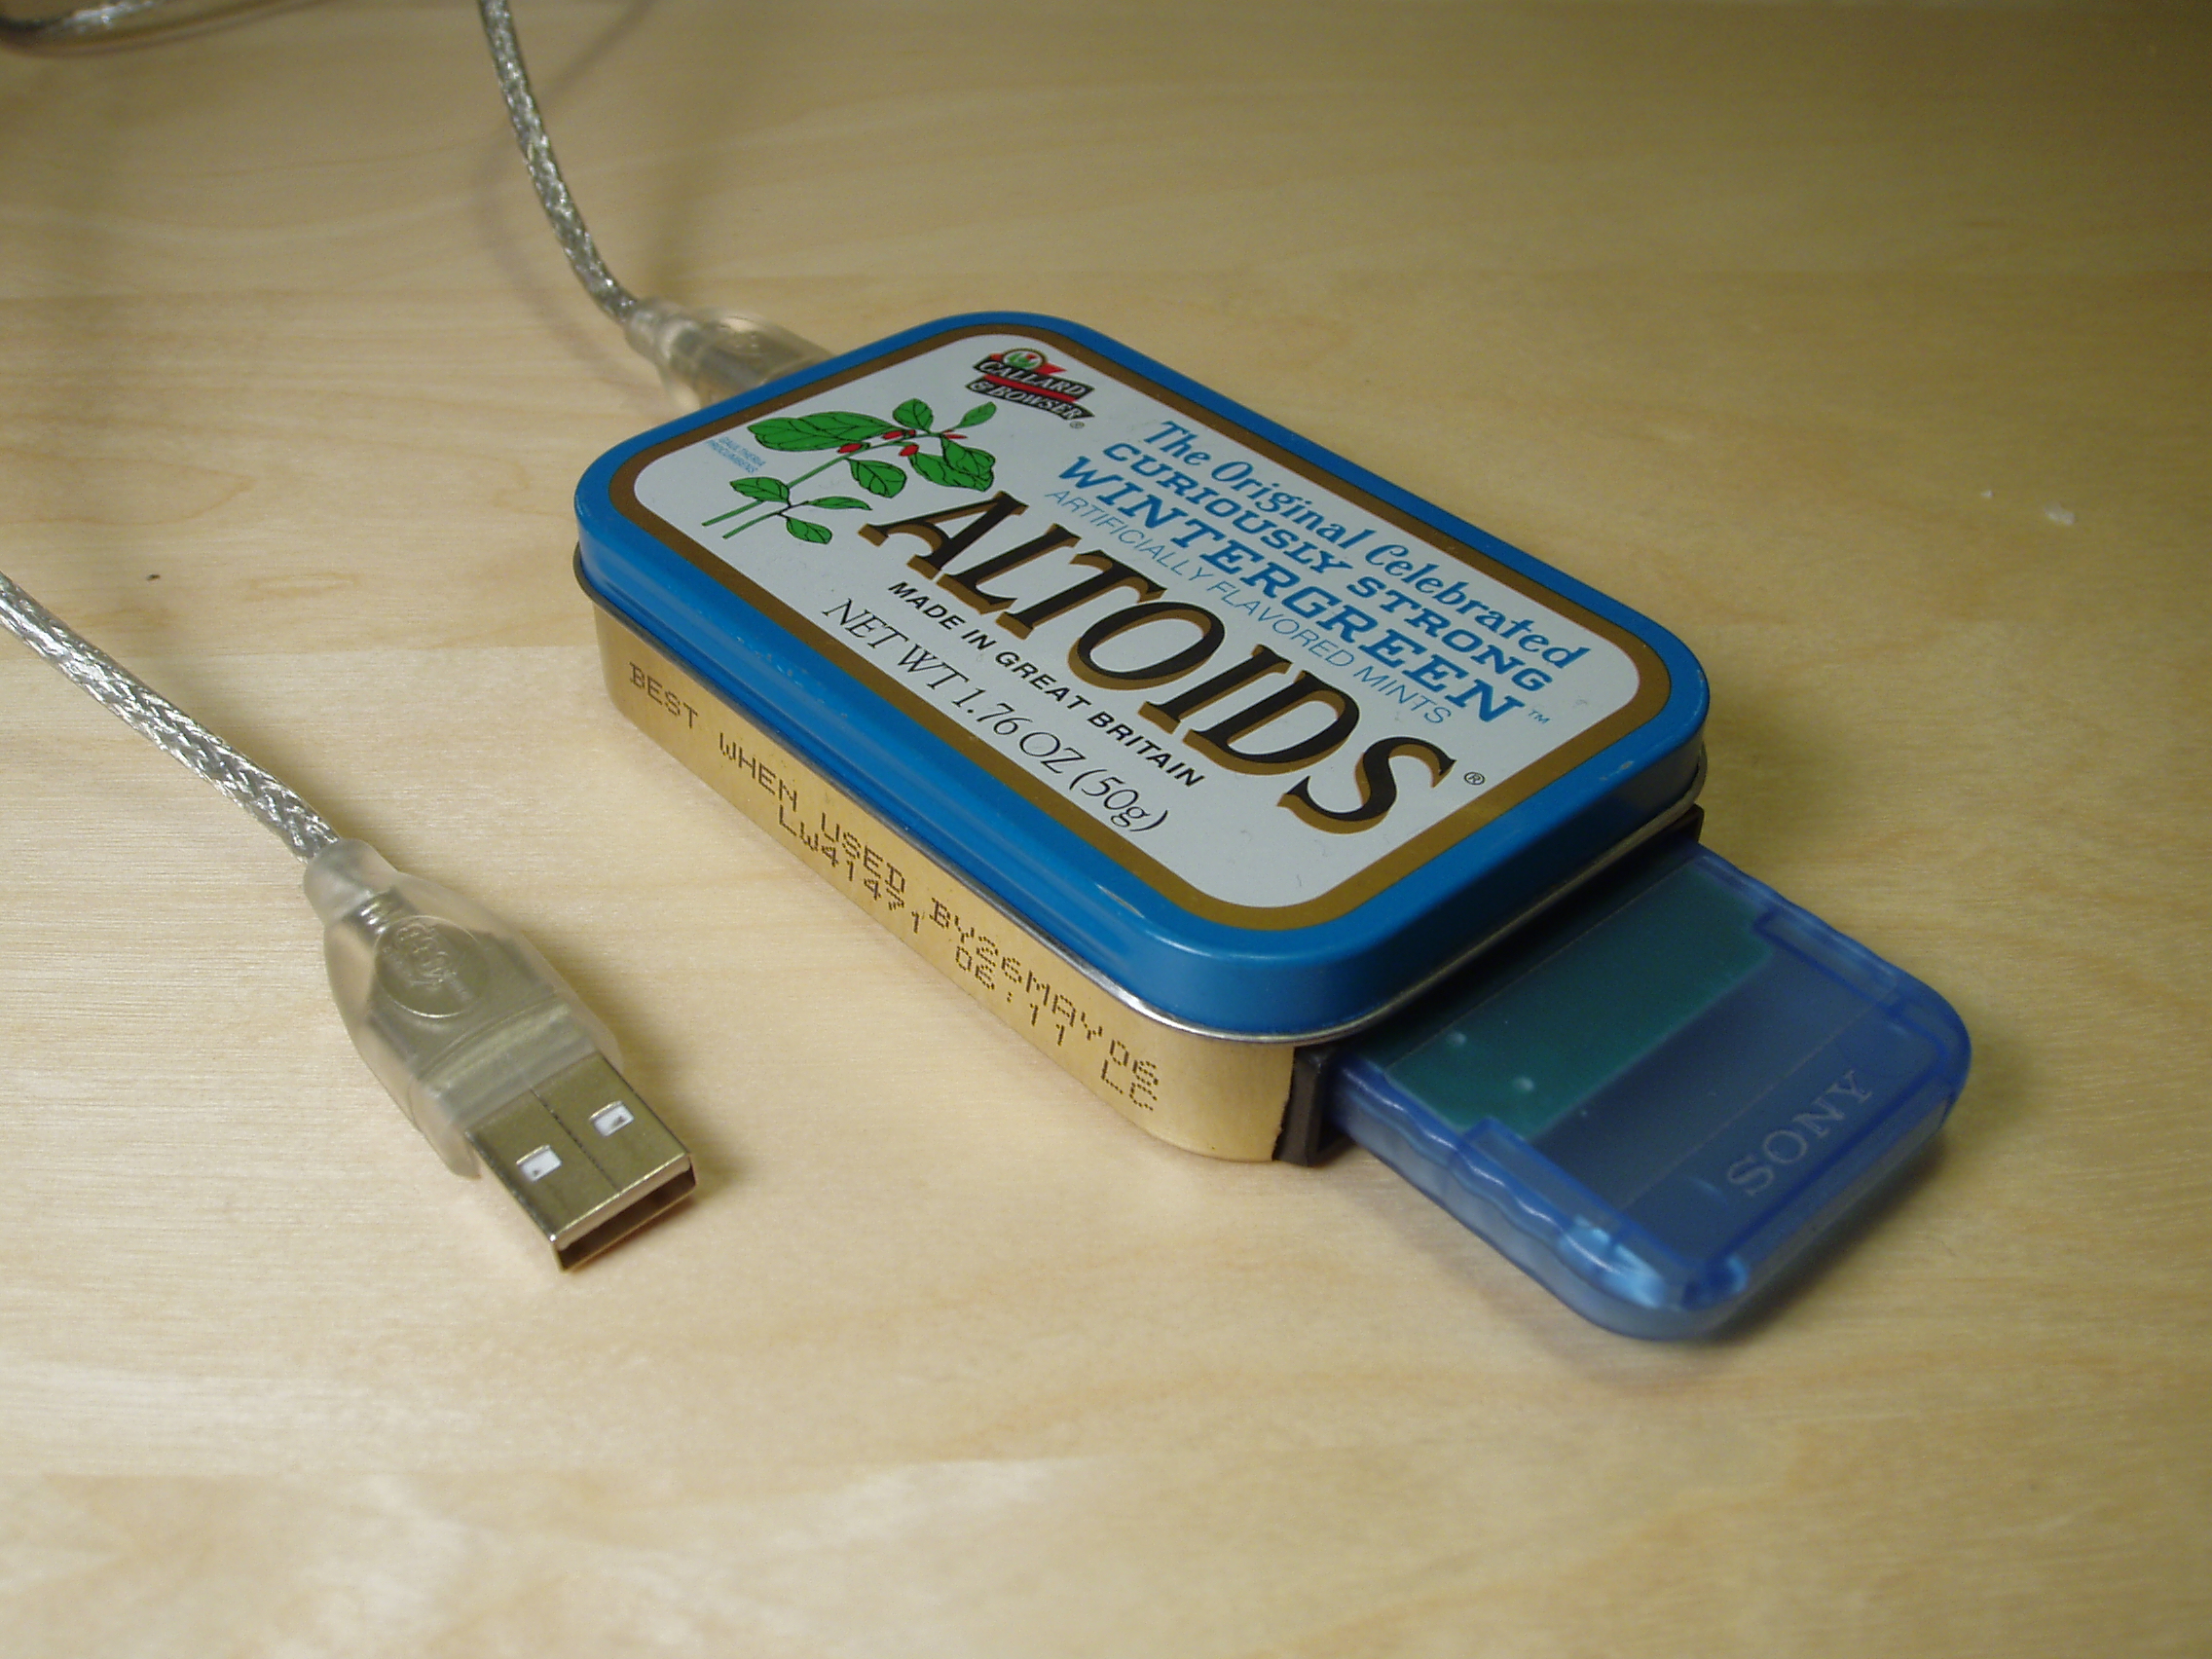
Latest Altoids artwork


Medium: Altoids tin, Keyspan USA-19HS (modified), PS2 Multitap (modified), 74HCT04 inverting buffer, discrete passive components, solder, wire, epoxy.

Artist’s inspiration: Dorky boyfriend that crafts Final Fantasy Tactics characters with the precision of a meticulous dungeonmaster ๐Ÿ™‚

(Yes, it’s a USB Playstation memory card reader/writer. Firmware and source code for Mac OS and Linux is in Subversion. The software doesn’t yet support PS2 cards.)